
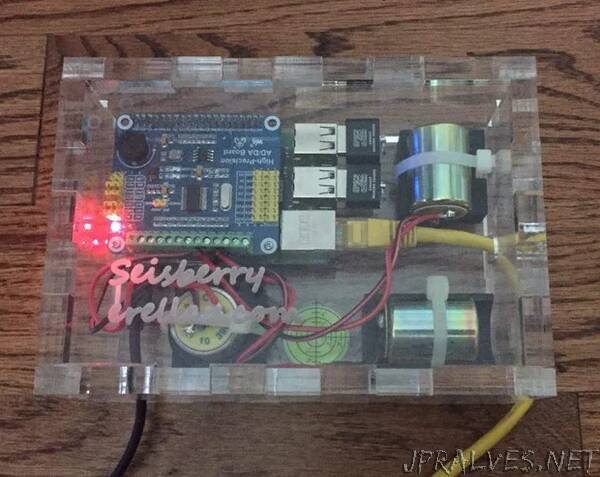
“The Seisberry in autonomous mode: 3 orthogonal broadband geophones, oriented North, South and Vertical; a Raspberry PI running Raspian Buster (green PCB); a HAT (Hardware On Top) blue PCB to perform AD (Analogic to Digital) conversion; one internal micro SD for the Linux OS; two external Micro SD memory to store the seismic data in raw format and Miniseed / Segy; a power supply, here instantiated as a 5V battery for autonomous use. For stationary use, the battery is replaced by a regular USB charger, like an iphone charge. The network connection (either wifi or cable) is used for communication with the device (sftp, VNC, http) and synchronization of the time server.
For those eager to get going, head to the Seisberry Fast Build page. The basic build should take about 30mn if you have some previous Raspberry Pi project under your belt, maybe 1 hour if it is your first Pi project.
I wanted a seismic node, fully open source, with 1 to 4 components, able to record either autonomously in the field and output SEGYs, or be used as an Iris seismic station recording mini-seeds and uploading to an Iris server. I also wanted the node to run an Apache web server accessible in 1 click from anywhere in the world and displaying the last 48 hours of recorded seismic activity. The 1 component version needed to be under $100 and the 3C version under $160, to be truly accessible to schools or institutions in developing countries.
Before embarking on the project, I considered the Raspberry Shake, but with a price tag from $340 in the most basic 1C version to $840 for more interesting ones (May 2020 prices), a closed source software and a very limiting 10ms sample rate (suitable for seismology but insufficient for reflection seismic), I decided not to go this route. The Raspberry Shake may still be suitable for users who want a plug and play solution, and value some support. The whole shakenet infrastructure is also very valuable, for those interested in those features.
The British Geological Survey has a simple and well documented project based on Raspberry Pi, but the ADC board they use and the choice of pure Python is unfortunately limiting the performance. Still, some of the concepts of the current project draw some inspiration from the BGS project.
In the end, I decided for my efforts to fork Will’s project as it is open source and make use of one of the best (and still super cheap) ADC board available in the market (in mid 2020). The original code is clean and well documented, so I thought it would be a quick and easy project. It ended up to be much more than I anticipated, with a steep learning curve on Raspberry Pi, a deep dive into Linux systems and eventually some mechanical design.
For those who wish to reproduce the project from the source but without the pain of the discovery work, I ended up writing a very detailed guide here, also available on Github. Read the guide, it is a labor of love, and it compiles all the information I wish I had when I started this project. I distribute the source code on my Github page only, as for version control and accessibility to user it beats any static web page solution. The data processing and everything not real time is written in Python and available here. I ended up rewriting most of the Python from the original fork but the original spirit and ideas still live. Some of the python code is optimized for Raspberry hardware (with its limited memory and 32 bit system) while some other programs are optimized for a 64 bit work station. Regardless of the optimization, the Python code is OS agnostic, tested on Windows, Linux and Raspbian, and I am pretty sure it will work on Mac as well. The real-time part, close to the hardware and where performance is critical is written in C and available here. It is from the board manufacturer’s example, modified by Will for the seismo-meter purpose, to which I added a few features after the fork, like the ability to change gain or sample rate without recompiling the code. Finally, the additions to the original fork were the crontab scheduling of tasks, the disk cleaning scripts removing older files on a daily basis, the Apache server and the web page showing the last 2 days of data, all updated daily by Python scripts. Also some output options like SEGY and mini-seed, and the GPS time server for offline real time.
The transparent acrylic box is designed with boxes.py, then the various holes and the engraving are made in Inkscape. I used 9mm transparent acrylic, which is totally overkill and on the expensive side for such a small box, however… I love the look and feel of it, particularly the prismatic reflections inside the acrylic walls. The Seisberry (that’s the name of the project, if you wondered) had to be a good looking object. I got the acrylic laser cut by Ponoko. The quality was absolutely flawless but the order very slow, possibly due to the Covid19 disruptions at that time. I went through various box designs and the latest is here, ready to sent to Ponoko (or their competition) in svg format. Use 9mm thick clear acrylic, make sure the contours, including the through holes are set to “cut” and the logo is set to “engrave”.
The geophone supports are parametric and designed with OpenSCAD: one model for the vertical geophone, and one model for both horizontal geophones. The Openscad files are also here on Github if you wish to modify them. Alternatively you can download below the .stl, ready to be sliced to your 3D printer, or printed by any online supplier. I printed mine on my Ender 3 Pro, in PLA. There are grooves for cable ties, so definitely use supports in your print. I used 100% infill for rigidity. If you print online and are unsure of the material, I would recommend something more durable than PLA, maybe PETG.”