
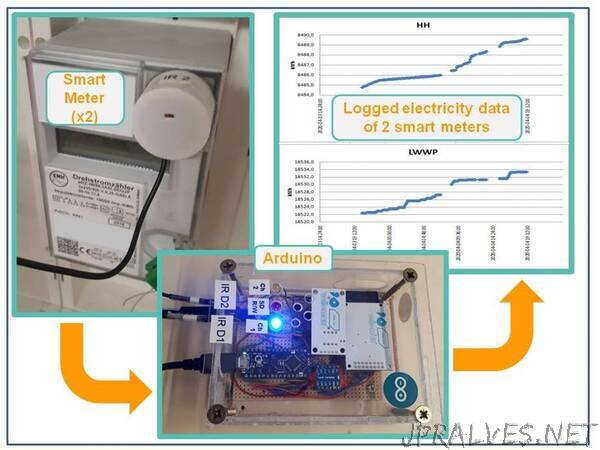
“This project describes how to log electricity consumption of 2 different consumer circuits by reading the corresponding 2 smart meters (“eHz”=”elektronische Haushaltszähler”) simultaneously to an SD card.
It all started wanting to get a better understanding of electricity consumption w/i our household. There are 2 smart meters, the first one tracking electricity consumption of the heat pump and a second one tracking general electricity consumption (lights, stove,…).
In the www I found a project that does this job for 1 smart meter (by Volker Wegert). However that project is using an Arduino Uno and due to its memory limitations only data of 1 smart meter can be logged. Nevertheless it gave me (I’m pretty much new to Arduino, electronics and programming) a lot of insight and ideas.
During plyaing around w/ that code I stumbled across the recently released Arduino Nano Every and thought that it should be possible to achieve logging of 2 smart meters due to its much higher memory compared to Arduino Uno.
Implementation
Hardware
Core of the project is an Arduino Nano Every.
To store the smart meter data an SD card shield (Velleman VMA 304) is used. Since the latter one operates at 3.3 V (higher voltages will probalby fry the SD card shield according to what I’ve found in the www) while Arduino output is at 5 V, a bidirectional level-shifter converting 3.3 V <-> 5 V is needed in between.
Finally, to store the time of data acquisition together w/ the smart meter reading, a RTC (Real Time Clock) shield (Velleman VMA 301) is used.
The reason for choosing the above mentioned shields is simply my lack of experience and knowledge of alternatives and therefore the result of searching in the www for potential candidates. In the end they have proven to do their job, nevertheless there might be other shields or components suited better.
The schematics is shown below. (Hint: In the schematic it says an Arduino Nano is used. This is due to the fact that in Fritzing PC software - which I used to draw the schematic - no Arduino Nano Every was available. This does not really matter since the pinout of both is the same.)
Comparing my schematics w/ the inputs I got from Volker Wegert’s project shows that I replaced some resistors:
between IR phototransistor and GND: 15 kOhm —> 1 MOhm (470 kOhm also sufficient). Necessary to bring BC337(-25) transistor to achieve the necessary gain (probably because of lower gain of BC337-25 as compared to BC337-40 or maybe signal of IR sender of eHZ too weak or alingment IR sender to IR receiver not precise enough)
between collector of transistor and VCC: 15 kOhm —> 22 kOhm (simply due the fact that I had 22 kOhm available)
The smart meter of type “eHZ-IW8E2A5” provides so called OBIS data every few seconds via IR pulses (no trigger necessary). The OBIS data is contained in a serial data stream in SML format. Since Arduino Nano Every hardware can only handle one single serial data stream, SoftwareSerial library is used in the code to read the separate serial data stream of each of the 2 smart meters.
The IR pulses from the eHZ sender diode are recorded by IR phototransistors (SFH309FA), (inverted and) amplified by a transistor (BC337-25) and then provided to pins A0 and A1 of the Arduino Nanao Every, respectively.
The picture below shows my early version sensor head (which gave me trouble to get sufficiently precise alignment of sender diode and receiver phototransistor) and the 3D printed sensor head (for printer file see link to Stefan Weigert’s SML page provided w/i the software code). Since some smart meters require a trigger to send out SML data, the smart meter as well the IR reading head offer 2 openings. For the “eHZ-IW8E2A5”, however, no trigger signal is needed, so only the IR phototransistor is mounted into 1 of the holes (the left one in the picture below; the other one remains empty).
In both cases it is easy to mount the sensor head to the smart meter, since surrounding the IR diodes of the smart meter there is a metal plate. So just add approrpiate magnets to attach your sensor head to the smart meter.”