
“Choose the colours of the LED strip using Hue/Saturation/Value parameters, flick the switch and watch your music come to life through FFT.
I was intrigued by the possibilities of addressable “Neopixel” RGB LEDs. I wanted to learn how to control them and to use them in a challenging project. I had read a few projects that use LED arrays and matrices to represent the audio spectrum, much like the illuminated displays on graphic equalizers.
I thought of something a bit different. How about a vertical string of LEDs where the low frequencies would be at the bottom, the high frequencies would be at the top, and the amplitude of each frequency band would appear as the brightness of each LED? The music would then “pulse” along this string. I am certainly not the first to think of this or execute it, but I had not yet seen this particular application.
If the brightness of the LEDs was controlled by the music, could the colour of the LEDs be set by the device’s user?
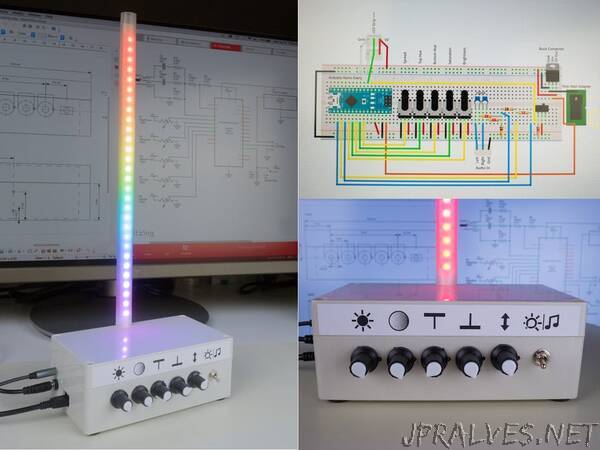
The circuit and the code for this device operate in two modes. These modes are selected with the mode switch at the right of the front panel. When the mode switch is in the left-hand position, the Colour Set mode is activated.
The Colour Set mode allows the user to set the colour range of the LED strip using the 5 potentiometers. Specifically, from left to right, the potentiometers adjust:
1. Value - the overall brightness of the LED strip
2. Saturation - this setting gradually shifts the Hues between vivid colours and pure white
3. Top Hue - specifies which Hue (colour) is at the top of the LED strip
4. Bottom Hue - specifies which Hue (colour) is at the bottom of the LED strip
When the LED strip contains more than one Hue, the colour sequence always follows the sequence of the colour spectrum: red, orange, yellow, green, blue, violet.
To select a single Hue for the entire LED strip, simply place the Top Hue and Bottom Hue potentiometers in the same position.
5. Spread - controls how widely the Hues are spread along the LED strip, from concentrated in the middle to “bunched up” at both ends.
I used the Hue, Saturation and Value (HSV) colour model to control the LEDs as opposed to RGB parameters, because HSV directly produces the effects I wanted. This article explains and compares the HSV and RGB colour models. Luckily, the Adafruit Neopixel library used in the code accommodates both RGB and HSV.
When the mode switch is in the right-hand position, the FFT mode is activated. In this mode, the potentiometers are deactivated.
The FFT (Fast Fourier Transform) mode accepts input from a music player’s headphone connection. Using FFT, it calculates the Value (brightness) part of the HSV settings for each frequency band. It then combines this Value parameter with the colours chosen by the user and sends them to the appropriate LEDs. This article gives an easy-to-follow explanation of Fourier transforms. The actual calculations are over my head but once again, the generous Arduino community comes to the rescue in the form of the ArduinoFFT library.”