
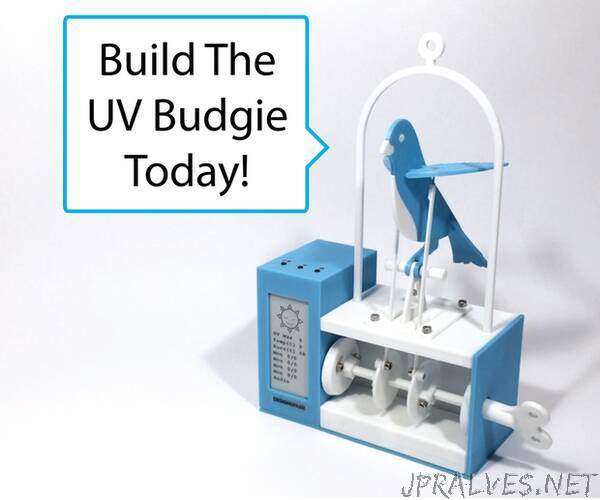
“Meet Sonny the UV Budgie - an automata IoT bird who looks up online weather data from the Met Office API and announces the UV index for the day and the week ahead (in doing so, he flaps his wings automaton-style!).
The image of the display shows actual data in the UK heatwave where burn times were 20mins max. The Budgie warns the user of what the midday sun or ‘Peak UV’ will be (i.e. what’s the most protection you need if leaving the house in the morning - when the UV might initially be low, but could get seriously high at noon!), and serves as a reminder that, for example, sun protection is still relevant on a cloudy day.
The UV Budgie was developed as a way to engage kids in becoming more aware of the importance of being ‘sun-safe’ by ‘listening to Sonny’s advice’. For the parents, it also gives more technical detail, like how long to stay out in the sun on a given day, as well as the days ahead.
The settings can be configured as you wish, as the entire project (Code and Build) is entirely open source. The project has been designed such that you may even wish to reconfigure the IoT device to look up other APIs such as Forest Fires, Air Pollution, or Flood Alerts. As the code is open-source, the device can be re-configured to suit the users’ skin tone, i.e. sun sensitivity.
Hopefully this is a great primer for kids (and big kids) to learn about 3D printing, IoT, mechanical design, and online data. Indeed, the wealth of data this generation now has access to (freely!) is extraordinary, and no doubt more projects like this will be ‘plug n play’ for the generations to come.
What would you do with a 3D Printer, some IoT protocols and a world of APIs/Data-Sources??
~ ~ ~
ICYMI: The hardware build is actually a ‘Daughter’ of the ‘Mother’ - The Good Air Canary - a project created for DesignSpark community of engineers and makers. . The software is of course entirely new, and full credit and much thanks to Pete Milne for his help on bringing it to life. Lastly, my 6 year old son provides ‘lead vocals’ of Sonny the UV budgie.
What would you do with a 3D Printer, some IoT protocols and a world of APIs/Data-Sources??
ICYMI: The hardware build is actually a ‘Daughter’ of the ‘Mother’ - The Good Air Canary - a project created for DesignSpark community of engineers and makers. . The software is of course entirely new, and full credit and much thanks to Pete Milne for his help on bringing it to life. Lastly, my 6 year old son provides ‘lead vocals’ of Sonny.
Supplies
As mentioned, the hardware is essentially the same as the Canary, but has some small upgrades (such as a Demo button), making it easy for kids to press at home… or indeed, if in a public space like a school - this might be a nice interactive project for education!
The intent of this project is that it uses readily available microcontrollers (Arduino for IoT, Adafruit for Audio and Servo control), and 3D printing held together with affordable fixtures. It can be hand soldered using generic ‘protoboard’. The only ‘exotic’ part is really the e-Ink Display, which at the time of creation was common in industry, but less so in the maker community. I’m rather fascinated by it’s potential to be low-power, as the ‘ink’ remains even when no electricity is passed through it, making if perfect for slow-changing screens, as well as having a ‘calmness’ not using light, as I find illuminated screens a bit glaring at night if in the same room as you sleep.
3D Printing:
- 3D Printer (or able to print files via LINK below).
- White PLA Filament
- (+ 1 Alternative Colour, e.g. Yellow
- Printer Nozzles of 0.6mm, though 0.4mm will also be fine.
Fixtures & Fittings:
- Brass Inserts - 1x 100 pack
- Hex M3 x 6mm Screws - 1x 50 pack
- CSK M3 x 6mm Screws - 1x 50 pack
- 4mm (dia) x 1mm (thick) Magnets
Electronic Components:
- Servo 9g (215-3180)
- 2.9” Waveshare B/W eINK Screen
- 5V Linear Voltage Regulator
- 1N4001 Diode, 1A, 5V (628-8931)
- 330nF Multilayer Ceramic Capacitor
- 100nF Multilayer Ceramic Capacitor
- DC Power Adaptor 9V, 1A
- DC Power Socket
- 3x Momentary Buttons 4.9mm
- Toggle Switch
- 3W Speaker
SBCs/Boards:
- Arduino Nano 33 IoT (192-7589)
- Adafruit 16-Channel 12-bit PWM/Servo Driver
- Adafruit Audio FX Sound Board + 2x2W Amp
- 70x90mm Double Sided Protoboard
- 20x44mm Double Sided Protoboard (Likely as part of any set/stock of the above)
Consumables:
- Wire for PCB Wiring-up.
- SuperGlue (1x3g tube will be ample).
- Sellotape / Masking Tape.
- Cocktail Sticks.
- Sandpaper (suggested 400, 600, 1000 grit)
Generic Tools:
- Soldering Iron, Soder, etc.
- Mini Hand Files - Flat, Round, Square (for metal, and plastic filing).
- Mini Blowtorch (or soldering iron) - to insert Brass Inserts.
- Hex 2.5mm Key / Driver (for Screws).
- Scalpel / Craft Knife.
- Calipers.
- Hot Melt Glue Gun.
- Drill/Handdrill with 1.5mm, 3.0mm, 3.5mm, 4.0mm drill bits.
GitHub:
GitHub Repo: https://github.com/milnepe/uv-budgie-controller
Download all files.”