
“This project allows an Arduino board with USB capabilities and connected LCD screen to act as a HID-compliant Auxiliary Display for your PC
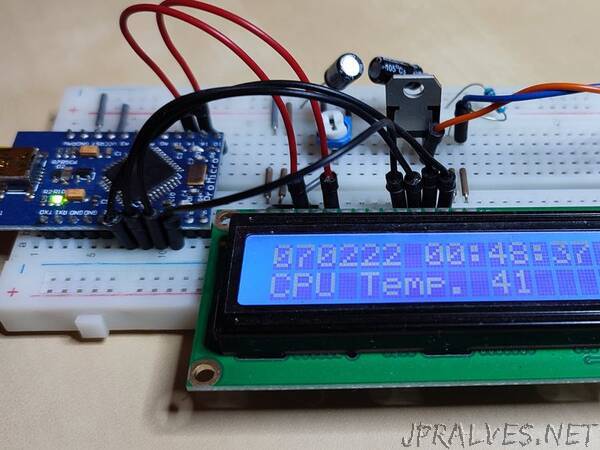
This project allows to connect a small text LCD display to the host PC using the standard HID-compliant protocol over the USB, and print a processed output of any shell command, that can be executed on the host PC. The text on the LCD screen you see on the photo has been combined from the output of 2 shell commands (I’m using Linux host):
date “+%d%m%y %T”
and
sensors -u | grep —no-messages -A 3 coretemp-isa | grep temp1_input | awk ‘{print $2}’ | awk ‘{printf(“%d\n”,$1 + 0.5);}’
The commands are configurable so the output can be anything, including but not limited to CPU temp, GPU temp, available RAM, CPU load, FAN speed, current date/time etc. There is no limitation on which commands can be used - basically anything that you can type in the terminal and get some output, can be displayed on the LCD.
Let me share some background why I started this project. My initial need was to add a small LCD monitor to my home theater PC, which is also used as a gaming rig and an AI training device since it has 2 powerful GPU on board. Sometimes CPU and GPU were getting pretty hot so I wanted to have a small display on the box itself showing its temperature and other parameters continuously.
I came across one project here on Project Hub, which did the CPU/GPU temp monitoring however I did not like the fact that it is using a virtual serial port for communication between the Arduino board and the host PC. This approach may work ok, however it does not utilize the benefits of USB protocol and does not support plug-and-play. So I decided to develop my own solution, which is further exploring the idea of connecting different devices to the PC using the standard HID protocol. Another requirement was to make the solution configurable so that the displayed information is not limited to a predefined set of monitored parameters.
Long story short, I bought a 16x02 display and started my experiments. Connecting LCD to Arduino was easy so I’m not going to repeat it here. You can find lots of articles considering it in details - for example, this one. I used the schematic diagram from there but had to adjust the pins since I’m using Arduino Pro Micro.”