
“A few years ago, I started making my first Word Clock, inspired by the nice Instructables available.Now that I made eight Word Clocks, which I try to improve each time, I think it is time to share my experience!
An advantage of my experience is that the latest version of my Word Clock is actually quite simple: if you have all the components, you should be able to build it in one day.
First, the inside of the Word Clock.
My current version uses a RGB led strip: this is a led strip in which each ‘light bulb’ consists of a Red, Green and Blue led. By combining the three colors, (almost) every color can be created. The RGB led strip is controlled by one input (still a bit of magic to me). So, by connecting one wire, you can control all the leds in the strip!
Behind every letter on the face of the Word Clock (please see later this step) hides one led of the RGB led strip. So, when one led turns on, it should light up one letter. To accomplish this, I used a laser cutter to cut out a grid of wooden board. In other Instructables, this grid was made using foam strips that are put together in a grid. I also tried this, but this did not work out for me. However, in my first version, I made the grid out of thin wooden strips which I glued together. This works perfectly fine, but takes a lot of time to build!
The brain of the Word Clock is the Arduino Nano. This tiny computer is able to control the RGB led strip. You can find infinitely many programs on the internet to mess around with, quite fun!
To avoid a lot of soldering (which takes time and is quite a craft), I use a terminal adapter for the Arduino Nano. All a terminal adapter does is to enable us to connect our wires to the Arduino using screws.
Of course, the purpose of any clock, besides being pretty, is to display the time. In my Word Clock, an Real Time Clock module (RTC) keeps track of the time. The idea of this module is that once you set the correct time, it keeps ticking (until its battery is dead). I work with the DS3231 RTC, which is quite cheap and a lot of support is available on the internet.
Now the inside of the Word Clock is clear, we move on to the outside.
From experience I know it is important to start your project from a convenient base. That is why I build almost all my Word Clocks using the RIBBA frame of IKEA. The advantage of this is that you start with a frame of which all angles are nicely 90 degrees and the finish of the outside is seamless.Of course, you can build your own frame if you like, but I would stick to the RIBBA frame.
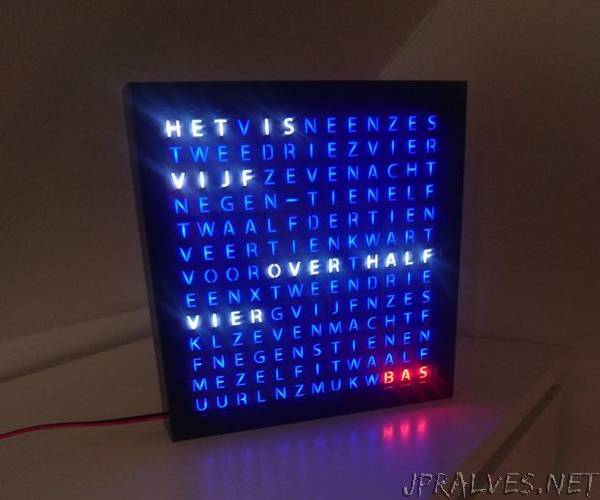
The face of the Word Clock is determined by the letters through which the light indicates the time. I found two ways of creating this face:
Printing on transparent foil. You can print the negative of the letters on the foil. The black ink stems the light. A drawback of this option is that the ink should be dense enough to be non-transparent. A possible solution is to print the face twice and stack them on top of each other. Laser cutting paper. If you are able to use a laser cutter, an option is to cut-out the letters from paper. If the paper is thick enough, no light will pass. However, you should use a ‘stencil’ font. These kind of fonts have no close circles. So, for example, the ‘o’ will not be just a hole in the paper, but actually a ‘o’. What does the Word Clock do?
Of course, the Word Clock should tell you the time. Besides, since we are using a RGB led strip, you can light up any letter in (almost) any color you want!You can set the color of the individual RGB leds by programming the Arduino Nano. If you want to be able to change the colors of the leds in real time, you can add a button that does this for you. However, since I want to keep it simple for now, this is not included in this Instructable.
Recently, I developed a Word Clock which uses Bluetooth to set the colors and the time. If I find the time I will post an update about this!”