
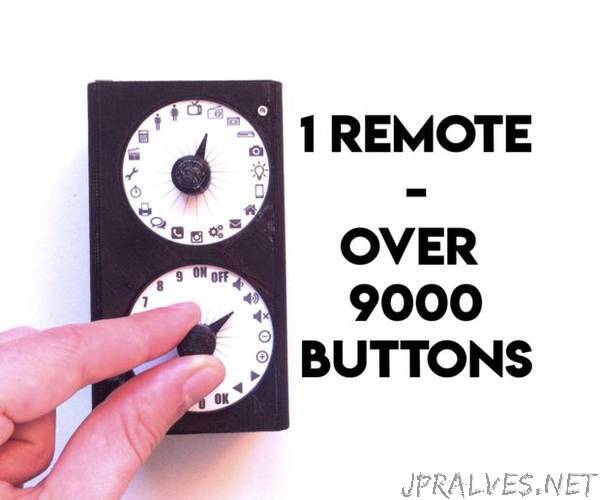
“Okay, the image is a bit misleading, there are not “over 9000” buttons on this remote, but rather 400 buttons. And you can control up to 20 devices through infrared (IR), with 20 different actions.
What is it?
It is a universal remote based on an Arduino board.
Why this project?
First, to learn more about Arduino. Second, because I could not find a real universal remote. I mean a remote that could control many devices. And that could be switched off, but still be ready to use (because most of the Arduino remotes I found do not save the data).How does it work?
Rotate the first knob to select the device you want to control. Rotate the second knob to select the action you want to do on the device. Long press the knob (which is also a pushbutton) to “absorb” the IR signal sent by the remote you want to clone. Or short press the knob to send the IR signal.Of course, the remote has an IR receiver to “absorb” the IR signals of the remotes you want to “clone”, and an IR LED to send them. These protocols are saved on a microSD card, therefore you can switch OFF the remote (and the Arduino board), it keeps the information concerning the signals on the microSD card. There are also 2 rotary encoders with 20 positions each, and that is how you can have 400 buttons. Each rotary encoder is also a pushbutton. There is a LED to inform whether the universal remote is receiving or sending IR signals. This device works on a Lithium Ion battery (18650 cell), so it is portable. And finally, there is a switch, so you can switch it ON and OFF.
What you will need:
An Arduino board (I have used an Arduino nano for the final project because it is smaller). Jumper wires. 2 rotary encoders (I have used the KY-040). 1 IR receiver (I have used the KY-022). 1 micro SD card reader for Arduino. 1 micro SD card. 1 IR LED. 1 LED (any color, it does not matter). 1 18650 cell. 1 18650 cell holder. 1 lithium battery charger (TP4056). 1 boost converter (<5V to 5V).Depending on where you buy these pieces, it can cost between few euros/dollars up to tens of euros/dollars.
Before to start:
On the first steps of this instructable, I explain how I have used each Arduino module individually. If you are already an Arduino master, you may want to go straight to the final project at step 7. If you are new to Arduino, you may want to read the first steps:
Step 1: How to Use a LED? Step 2: How to Use the Micro SD Card reader? Step 3: How to Use the Rotary Encoder? (KY-040) Step 4: How to Use the Push Button? (Debounce & Short/long Press) Step 5: How to Use the IR Receiver? (KY-022) Step 6: How to Send IR Protocols?Then come the interesting parts of the project:
Step 7: Final Circuit (with USB Cable) Step 8: Final Circuit (portable, With Battery) Step 9: Final Device (with the 3D printed Case)And finally, I am not a professional of Arduino boards… The final project works great, but if you find a mistake in the circuit or in the code, please let me know!”