
“Automatic window roller blinds that can be controlled wirelessly by a small remote, web interface or RESTful API.
The project consist of 3 parts:
Motor: the part that receives commands and moves the blinds
Remote: a small remote to control the motor
Web interface: an ESP32 running a web interface that can be used to control the motor from any browser in the network
Making your own
For this project you will need a 3D printer, patience, fair soldering skills and some experience with Arduino and Platform IO.
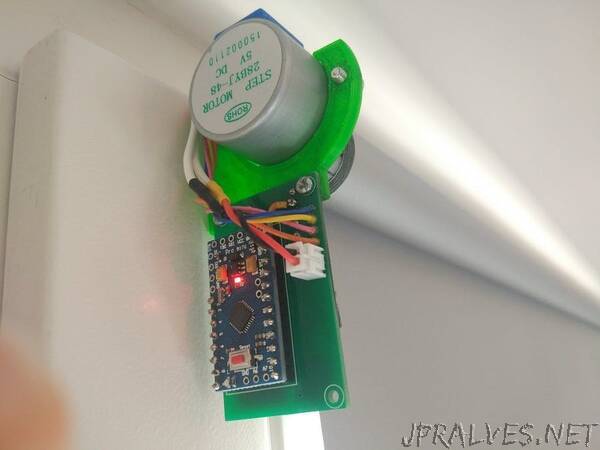
Automatic window roller blinds that can be controlled wirelessly using a NRF24L01 module. Controlled either by a small remote, web interface or RESTful API. Built around an Arduino pro mini and a cheap stepper motor.
How to use it
This assembly replaces the side of the roller blinds with the string. This means they can no longer be lowered or raised manually. You will need to route a wire to each window, in order to supply the 9V required.
The blinds are controlled by either the remote or the web interface or both. For more details on how to control and calibrate the blinds, see the related projects below.
Materials:
- Arduino Pro Mini 3v3
- 28BYJ-48 5V stepper motor
- 0805 1uf SMD capacitor
- 100uF(or higher) 25V SMD type D electrolytic capacitor
- 470uf 6V SMD size C tantalum or type D electrolytic capacitor
- NRF24L01+ SMD module
- A4988 or DRV8825 Stepper Motor Driver module
- 9V power supply (recommended 0.5A multiplied by the number of roller blinds)
- Power supply connector (usually DC2.5/5.5) (optional)
- Wire for connecting power
- Pair of XH 2.54mm 2-pin connectors (optional)
- 3D printed parts found in 3d print folder. 1x motor adapter and 1x mount(or mount-mirrored)
- PCB
- 2x M2x5 screws
- 2x M3x6 screws
- 2x M3 nuts”