
“In this age of WiFi and the Internet of Things, clocks should set themselves and be super accurate. Perhaps you’ve built an Arduino alarm clock in the past - you’ll be pleasantly surprised to see how easy it is to do this stuff with the newer Arduino processors and libraries.
The same thing can be said for time displays. With I2C interfaces, 7 segment and LCD displays can be used almost effortlessly to display time and date. We will look at some examples.
Background
In this tutorial, I’m using the Arduino MKR WiFi 1010 processor to demonstrate how easy it is to implement super accurate clocks with equally easy to use displays. The MKR WiFi 1010 has built-in WiFi and a built-in RTC (real time clock). The WiFiNina library used with the MRK 1010 has the capability of obtaining NTP (network time protocol) time. And the RTCZero library can use NTP time to set the built-in RTC. The result is a clock that is accurate to within a few milliseconds using nothing but WiFi and the processor itself!
The most common way to express the time on computer networks is called Unix time or Epoch time. It is expressed as the number of seconds since 0:00:00 on January 1, 1970. Since 1985, a network of servers has provided the Internet with a time service called Network Time Protocol or NTP. It is linked to atomic clocks and the super accurate GPS clock system. Computers do not always respond instantly and communication between them is limited by the speed of light, so keeping this network of time servers perfectly synchronized is complicated. But the net result is that anyone with an Internet connection can obtain the Epoch time accurate to within a few milliseconds of Coordinated Universal Time (UTC) – the super accurate world time standard.
Epoch time has to be converted to month, date, year, hour, minute, and second. Fortunately, the RTCZero library knows how to make this conversion and does it all for us. Epoch time, like other time standards, is based on the GMT time zone of Greenwich, England, so it has to be adjusted to local time zone. We have to adjust for the time zone ourselves.
RTCZero converts Epoch time to a 24 hour clock. But in the US, we typically use a 12 hour clock. Most other places use the 24 hour clock. In the U.S, we use month/day, while most other places use day/month. So the sketches included in this tutorial all have some User Settings where, in addition to your WiFi credentials and Time Zone, you can also specify 12 or 24 hour and the date ordered as DMY or MDY.
Four Projects
So far, we talked mostly about getting super accurate self-setting clocks, and adjusting them to our local time zone. But now let’s talk hardware and implementation. This tutorial is four projects in one. It is intended as a guide for your own easy clock building. Whether you need a sprinkler timer or whatever, you can incorporate these super easy clocks! Our four projects are:
1) Use the MKR WiFi 1010 to build a super accurate, self-setting clock. Then display the time and date on the Serial Monitor corrected to your time zone. We’ll explain how the time is obtained and how it’s adjusted for time zone.
2) Use the clock above to display the time on a 4 digit seven segment LED display in either 24 hour or 12 hour mode. A few years ago, it was a real pain to wire-up 4 seven segment displays to display the time. Programing them to display the time was a lot of work as well. Now we can buy a 4 digit display with an I2C interface (2 wires). The one I bought uses the HT16K33 interface chip, and of course there is a library for that, so just give it the hour and minutes and they display.
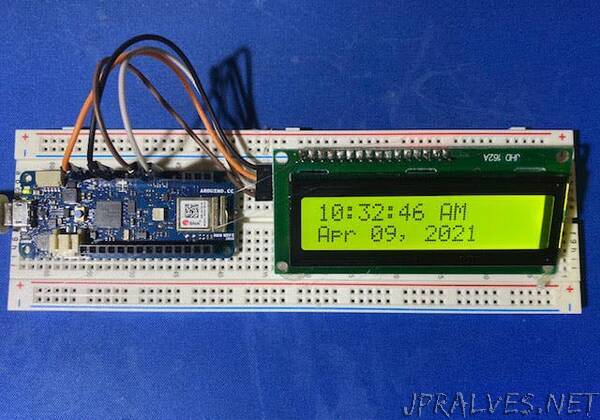
3) Perhaps you’d rather display the time with the month and date on a LCD display. We use the clock in 1) with a 2 x 16 LCD display to display time including seconds, with month and date on the second line. And again, we use I2C and there is a library to make interfacing it to an Arduino super easy.
4) Although there are already hundreds of alarm clock projects posted here, we can’t have a time tutorial without an alarm clock, so here we add an alarm clock to the clock in item 2) above. For that we need to add some buttons, an LED and a buzzer.
Each project has its own sketch, but they are all similar, all taking advantage of WiFi and NTP to set the time and keep it accurate to within a few milliseconds.
PLEASE NOTE: The MKR WiFi 1010 has a 3.3 volt processor with 3.3 volt logic levels. Everything shown in our 4 projects runs fine at 3.3 volts, including the 5 volt LCD display. Don’t try to mix 5 volt logic with the 3.3 volt digital pins on this processor!”