
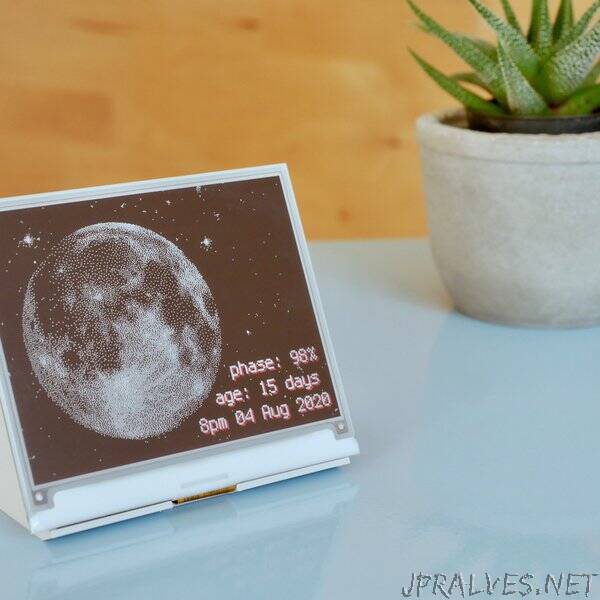
“A battery powered e-ink display showing the current phase of the moon.
I’ve used this project as a way to learn. It includes my first custom PCB, one of my first 3D prints, my first encounter with open source graphics software and some cobbled together CircuitPython code. I plan to write an update on each of these highlighting what I’ve learned, in case others want to venture down this torturous path. I’m indebted to NASA for the data and to the fine authors on the Adafruit learning system for showing me how to use it.
I really like the aesthetic of three colour e-inks and the idea of low power single purpose displays or indicators. They seem to have become far more accessible than previously and in a strange way it’s harder to think of a suitable application for them than it is to actually use them. A moon phase display seems a good use to me, we get really bad weather in the North of England and looking up at the sky of a night will more likely reveal a blanket of grey cloud than the shining lunar orb!
The main inspiration for the project was this cool blogpost from NASA, a goldmine of data and knowledge that just cries out to be used. It’s very slick and I guess you could just have a display with that page on a browser window but where would the fun in that?
So the brief I set myself was:
Design a simple and elegant display that updates in the morning to show the moon as you will see it that evening.
It has to be battery powered and last for at least a week.
Ok so I’m a novice at coding and am most familiar with python. I’ve tried battery powered raspberry pi projects in the past and know that they would not be as compact or long lasting as I require. That left me with Micropython or CircuitPython, I chose the latter because of the focus on beginners and the well documented hardware available from Adafruit.”