
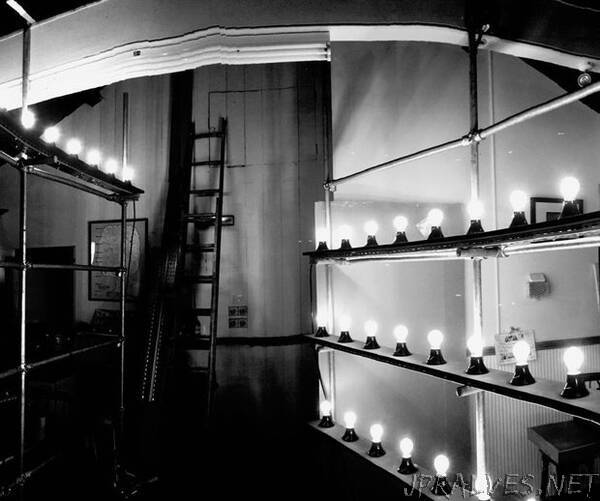
“A colleague and artist Jim Hobbs was planning to build a freestanding installation for an exhibition he was putting together. This installation would consist of 8 shelves forming a parabolic shape. Each of the 8 shelves was to have 10 light bulbs mounted to it. These 8 groups/shelves of light bulbs would need to be automatically and individually switched so we could create patterns of illumination. The piece references the light testing racks at General Electric.
We worked together on the technical side of the piece, and decided to have the controller centrally located on the structure and based off of an Arduino nano.
Although this is all very specific, the principles and code involved in this tutorial give a good starting point for using arduino with relays to control higher voltage or current loads. there are also a lot of possibilities with a controller like this if it were to be pushed in a slightly different direction. Have a look at the last step ‘scope and possibilities’ for some ideas!
High voltage electrics can be dangerous and should only be carried out by competent persons. If you are at all inexperienced in this field or unsure, please have the electrics checked over by an electrician prior to plugging in.
Supplies:Parts (alternatives to the linked parts are available)
- Arduino Nano
- 5v Relay module 8 channel
- Mini breadboard
- [30x] terminal blocks 2.5mm
- 1.5mm single core flex (cable)- in brown, blue, yellow/green
- [8x] outlet sockets
- fused inlet socket
- crimp terminals
- 1A 12v power supply
- 20cm male-female jumper cables
-Enclosure
Tools
- Precision screwdriver set
- Fine cut saw
- Dremel/rotary multi tool
- Drill
- Multimeter
- Ruler or combination square
- Allen/hex keys
- Spanner/socket set
- Crimp terminal tool
- Wire stripper
- Needle nose pliers”