
“Mikey Sklar designed the DA PIMP 2 (“Power In My Pocket 2”) based on George Wiseman’s paper “Capacitive Battery Charger” and generously released it to the open hardware community back in 2014.
It is capable of charging and desulfating/rejuvenating just about any rechargeable battery of any type, so long as the battery is not totally unrecoverable.
For more info on Mikey’s DA PIMP 2:
mikeysklar.blogspot.com/p/da-pimp-battery-desulfator.html
After eagerly waiting for Mikey to release DA PIMP 3 for a long while, I decided to design my own with a focus on safety and voltmeter accuracy and call it DIMP (“Desulfator In My Pocket”) version 1.
However, after communicating with some fans of DA PIMP 2, it seems that there is a preference for the all-in-one desulfator + voltmeter design of DA PIMP 1 and 2, so I have designed DIMP version 2 with an integrated voltmeter.
Here are the differences between Mikey’s DA PIMP 2 and my DIMP 2:
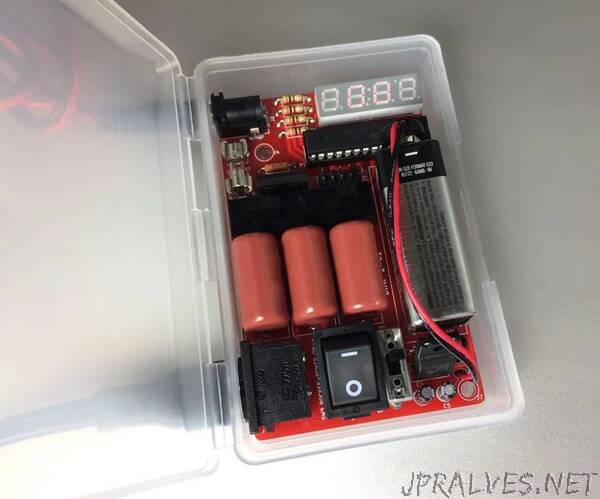
Switched to four-digit LED display
Rewrote voltmeter code on ATMEGA48V-10PU for four-digit display and improved accuracy at the low end
Replaced rare Schurter rocker switch with commonplace OMRON A8L rocker switch
Replaced dangerous jumper headers (used to select current output) with C&K L202 slider switches
Increased max power rating for R1 resistor
Changed diode bridge from round to D3K rectangular package
Reduced fuse cartridge size to 5mm x 15mm 2AG
Reduced PCB width to 61mm to fit soap box case
Increased PCB length to 97mm to fit the slider switches and extra display resistor
Moved 9V battery so that it will fit better vertically under the soap box’s domed lid
Added J5 and J6 strain relief holes for 9V battery leads
Added PCB mounting holes (J4 at top left is at 12.5mm,17.5mm from top left corner, J7 at bottom right is at -4.0mm,-4.0mm from bottom right corner) for 3D-printed housings with screw bosses
DIMP 2 is sold on ebay as a PCB and pre-programmed ATMEGA48V-10PU for DIY assembly. If you can solder with a low wattage pencil iron, you can assemble the DIMP 2. It takes about 1 to 2 hours to assemble.
DANGER: DIMP 2 exposes lethal voltages to the operator via the output leads. Do not buy or build or use DIMP 2 unless you take full responsibility for the safety of yourself and others nearby. Only adults with a proper understanding of the risks may attempt to use DIMP 2. I recommend that you do not buy or build a DIMP 2 if you have young children in the home, as they might plug it in and turn it on without knowing the dangers.
If you accept the lethal danger, here is how you build the DIMP 2.
PARTS:
The PCB and pre-programmed ATMEGA48V-10PU AVR chip is here:
https://www.ebay.com/itm/333424055652
The BoM is here:
https://www.mouser.com/ProjectManager/ProjectDetail.aspx?AccessID=f993d2cce1
Remove the extra ATMEGA48V-10PU from the Mouser shopping cart if the ebay listing includes one.
Please note that the BoM does not include the output leads because I was not able to find them at Mouser. You will have to source them elsewhere. It is very easy to find fully-assembled Y-cables with a 5.5mm x 2.1mm DC barrel plug and a pair of red and black alligator clips on ebay from various Chinese sellers for under USD$3. When buying, just be sure the wire gauge is thick enough to handle 5A and that the insulation on the alligator clips is good.
For auto or marine batteries you will have to assemble your own output leads by replacing the alligator clips with Mueller Kelvin clips, p/n BU-111-2 (red) and BU-111-0 (black) from Digikey. They have nylon bodies and partially-concealed brass jaws and are much safer than all-metal plier-style clips. Obviously, you still must not handle the output leads while the AC mains are connected, but these nylon clips will reduce the chance of accidental shocks.
Also, you will need one soap bar case. They are made by The Bottle Crew and sold at Walmart in the travel items aisle under the Equate brand for about USD$1. Get the clear/translucent white one. The other colors make it too hard to read the warnings on the bottom of the PCB.
REQUIRED TOOLS:
soldering iron with fine conical tip and optional medium conical tip (A fine tip helps with the DIP socket and LED display and a medium tip helps with the AC input port and the DC barrel jack, but you can do this all with either fine conical tip or medium conical tip.)
paste or liquid solder flux
solder
wire cutters or flush cutters
3/8in drill
XActo knife with triangular blade
sharp scissors
labelmaker or permanent marker or paint pen”