
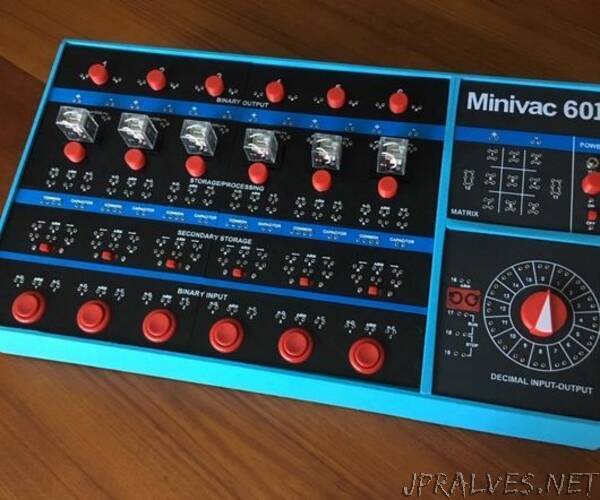
“Created by information theory pioneer Claude Shannon as an educational toy for teaching digital circuits, the Minivac 601 Digital Computer Kit was billed as an electromechanical digital computer system. Produced by Scientific Development Corporation in the early 60’s it sold for $85.00 (about $720 today).
Minivac 601 used electromechanical relays as logic switches as well as for very basic storage. Simple DPDT switches and SPDT push buttons made up the binary inputs, with lights to represent the outputs. A large motorized dial allowed the user to enter decimal or hexadecimal numbers, and to output numbers, or to act as a clock signal generator. For more information about the Minivac 601 here are some additional references:
Wikipedia
Center for Computing History
Time-Line Computer Archive
The Instructable presented here is for a full size replica of that Minivac 601 from 1961. I have tried to remain as true to the original as possible given the technologies and resources available to me. I don’t have a “vintage” unit so this replica has been constructed based on photos and from the original manuals that were available online. I have included these manuals in PDF format as part of this project. I brought these files to a local copy center and had them printed as the spiral bound booklets you can see above. I’m really happy with the results.
So how close is this replica?
Since “frame” for the original Minivac 601 was made from wood I feel that I have made a pretty reasonable reproduction. I’m not sure what the top panels were constructed from but this replica’s are 3D printed. The original had a built in transformer and used mains power. I chose to use a common 12V “wall wart” for safety reasons replacing the “fuse” on the Power Panel with a 2.1 mm power jack.
Sourcing the electronic parts was pretty straight forward, however finding parts that exactly matched the look of the original was harder. I lucked out on the slider switches finding some at my local surplus store that seem pretty much identical. The lights I found at the same surplus store did not have the right look but I was able to 3D print “caps” for them that were more in line with the photographs. I ended up sourcing relays that don’t look too bad, and could be made to match even better by removing the clear dust covers (I chose not to). The push buttons are considerably larger than the original’s, but they are readily available and robust “arcade” style switches so I went with them. I designed the rotary switch specifically for this project so it gets pretty high marks for an authentic look. See my Mostly 3D Printed Rotary Switch Instructable for details.
The biggest gap, and the reason I am calling this Version 0.9, is that the motorized rotary switch functionality has not been implemented yet. I had a version that sort of worked but wasn’t really reliable enough. So I’m going back to the drawing board as they say to fix that. Meanwhile the rotary switch works great in manual mode. So in the interim I have implemented a signaling mechanism to indicate when the motor is “engaged” and in what direction the rotor should be turned. For this version I am asking the operator to be the motor. In this way all of the “experiments” listed in the three manuals can be performed. When completed the motorized version will be a “drop-in” replacement for just the Digital Input-Output panel.”