
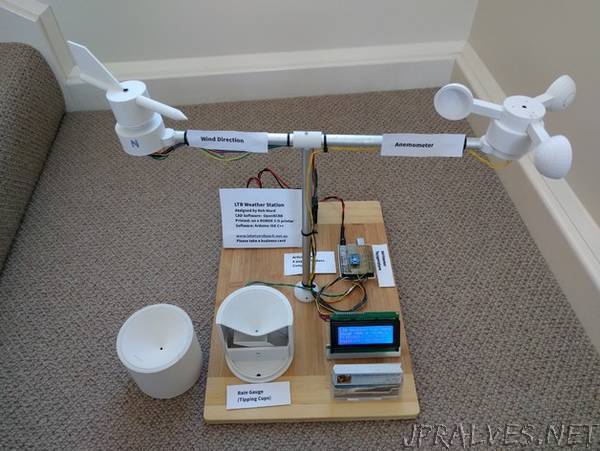
“Weather Stations are a very useful devices, and as we increase our knowledge of the global weather, quantifying our own local experience is also popular. Integrating aspects of the weather to IoT is increasingly important.
This project does not invent anything much new, but should give a working set of plans for a weather enthusiast to build their own station. The design is somewhat double-brick out-house in most places and has not been designed for hi-res printing with wafer thin walls. However it will produce a robust system that people may like to refine themselves. The OpenSCAD files are provided to allow people to customise the designs. The system was designed and built for an Arts/Science Exhibition, FLOAT, as a demonstration station, but has been wired up and demonstrates the usual functions. A cutaway funnel is also provided, which was used with the Rain Gauge for this exhibition.
The system also has the Arduino program included to illustrate how the the weather station can be interfaced, processed and results displayed. The Arduino program, as it stands, does not provide any definite calibration for rain and wind speed (if it is accurate, that has happened only by chance :-). Wind direction, Temperature and Barometric pressure are accurate. If you build it, and use my Arduino program, you will have to spend some time calibrating wind speed, and fine tuning rainfall.
The non-printable extras I used are listed below, and in the OpenSCAD and Arduino scripts. Plus the Arduino gear…. (I added a Barometric/Temperature sensor, but an obvious extension would be to add Humidity as well.)
Some suggestions for mounting the sensors are provided, along with glue on brackets and fittings to construct a simple “T” frame combined with aluminium tubing, however this can be adapted as circumstances dictate.
Post-Printing
Extra hints
The thrust bearings should be a tight fit and not require glue. The 5mm brass tube for the axles though will benefit from some cyanoacrylate on the ABS to hold them in place. Rough the tube up a bit with sandpaper or a file to help adhesion. The Temperature and Barometric pressure does not need calibrating. However Rainfall (it is fairly close) and wind speed will need calibration. As long as the magnet in the wind direction sensor is close enough to trigger two adjacent reed switches when half way between the two reeds, it will allow 8 reed switches to reliably indicate 16 directions.
The reed switches in the direction indicator are vertical and are not trimmed, just the top end curled over to allow easy soldering to the common earth wire ring. Extra spacing maybe required, eg a small ring of heat shrink tubing to keep the moving parts of the anemometer and wind speed separated and seated on the bearings in the stationary base. This was too fine to print.
All the magnets N-S poles should be aligned along the line of the reed switch. The magnet lines of force between N-S have the best switching effect, not one of the poles, N or S, on its own. This also helps eliminate bounce, or multiple triggering.
Non-printable Parts List
Arduino Uno Board + Prototyping Shield
10 of Magnetic Reed Switches, glass 14mm x 2mm
4 Thrust Bearings 8mm OD x2.5mm by 5 mm ID
3 Neodymium magnets 3mmOD x 2mm
Scrap brass tube OD 5mm (eg Car Radio Antenna)
Hook up wire
BMP085 Barometer/Temperature breakout (I2C)
PCF8574 I2C to LCD interface board
4x20 characters HD44780-compatible LCD
2mm steel axle for Tipping Bucket flip flop
Plastic tubing for spaces eg Heat shrink
Extensions
The Arduino system as described has a major shortcoming, it is assumed the sensors will be close to the CPU and there will be no long runs of cable. If longer cables are contemplated then larger pull-up resistors than the internally programmed pull-ups maybe required on all the reed switches. Very long cables may not be possible or recommended.
Mounting the computer close to the sensors and building a radio link maybe the best alternative, and using some other board than a UNO with at least 10 pins I/O free and some Wi-Fi could give a good combination. eg
https://hackaday.com/2017/11/13/weather-station-needs-almost-no-batteries/
Battery power poses even more challenges, but a larger battery charged by a solar panel is a viable option these days. Designing ultra low power electronic gear is a specialist area.
Printing times with 0.4mm nozzle, 30% fill and Support
3 Anemometer Cups and arms 1h21m (x3) = 4h3m
Anemometer Arm Hub 3h31m
Anemometer base 2h
Anemometer Bracket 16m
Wind Direction Vane 4h21m
Wind Direction Base 3h30m
Wind Direction Bracket 16m
Tipping Buckets 1h43m
Rain Gauge base 6h18m
Rain Gauge Funnel (full) 12h30m (Invert to print to avoid Support printing)
Estimated total 35 hours of Printing”