
“Welcome to this comprehensive DIY guide where we transform a standard ATX power supply unit (PSU) into a versatile and customizable lab bench power supply. This project is perfect for electronics enthusiasts, hobbyists, and students who need a reliable and adjustable power source without breaking the bank. Best of all, this entire project can be completed for as little as $50.
Why Convert an ATX PSU?
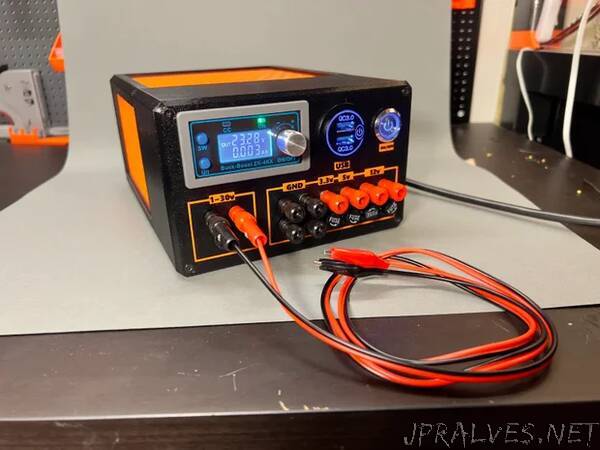
Converting an ATX PSU, commonly found in desktop computers, into a lab bench power supply unlocks its potential to serve multiple voltage needs. With a few modifications, you can achieve a variable 0-30V output alongside stable 3.3V, 5V, and 12V rails. Additionally, this project will show you how to incorporate USB outputs for devices requiring 5V power. This conversion not only recycles an older PSU but also offers a cost-effective alternative to commercial lab power supplies.
Project Features
- Variable Voltage Output: Adjustable from 0.5-30V for various applications.
- Multiple Fixed Outputs: Dedicated 3.3V, 5V, and two 12V outputs for common voltage needs.
- USB Functionality: Two USB Type-A outputs for charging devices or powering USB-based projects.
- Safety Features: Equipped with fuse protection and robust components to ensure safe operation.
Safety First
Before we begin, it’s crucial to prioritize safety. Working with electrical components and power supplies involves risks such as electric shocks, short circuits, and potential fire hazards. Always disconnect the PSU from the mains supply and let it sit for ten minutes before opening it. Wear protective gear, work in a well-ventilated area, and double-check connections before powering up the unit.
Disclaimer
Please note that this project involves working with electrical components and power supplies, which can be dangerous if not handled properly. Ensure you follow all safety precautions and double-check your work. I am not responsible for any damage, injury, or loss that may occur as a result of following this guide. Proceed at your own risk and always prioritize safety.
This Instructable will guide you through the entire process of creating your own lab bench power supply from an ATX PSU, from dismantling the PSU to the final testing phase. Let’s get started on creating a powerful tool for all your future electronics projects!
Supplies
Materials List
Below is a list of parts needed, including quantities and links for purchase.
- 3D Printable Frame - 1 set (Custom designed to house the PSU and additional components)
- Buck Boost Converter Module - 1x
- 19mm Power Button - 1x - I used the 9-30V(12V24V) Fixed Self Locking ones.
- Dual USB Socket - 1x
- Glass Tube Fuse Kit - 1 set
- Fuse Holders - 4x
- 50W Wirewound Aluminum Shell Resistor 8 Ω - 1x
- Banana Plug Sockets (Red and Black) - 5x each color
- M3 Brass Inserts - 8x - I used the M344.2 ones.
- Screw Terminal Block - 1x (Get one that has a higher Amp rating than the max of your PSU)
- Ferrule Sleeves - 1 set
- Insulated Connectors
- M3 Screws
- Heat Shrink Tubings
- Any ATX PSU (Non-modular)
Tools Required
You will also need the following tools to assemble and modify the PSU into a lab power supply:
- Soldering Iron: For making secure electrical connections.
- Wire Strippers: Essential for preparing wires.
- Screwdrivers: Needed for assembling and disassembling the PSU and other components.
- Multimeter: For testing voltages and ensuring connections are correct.
- Pliers: Useful for bending wires and handling small components.
- Ferrule Sleeves Crimper
- 3D Printer: For printing the custom frame.”