
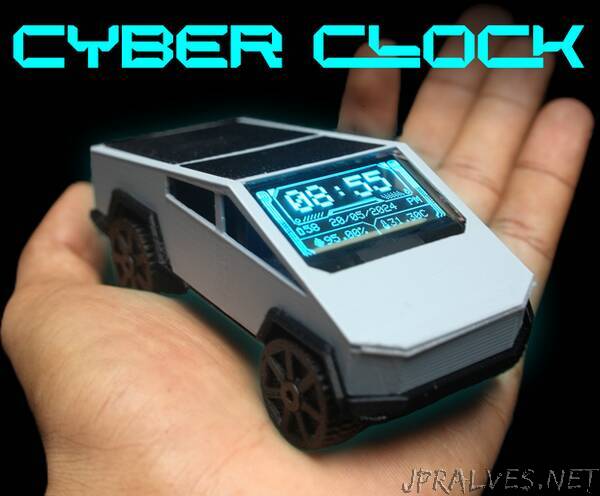
“As a tech enthusiast, I love seeing new technology and inventions. That’s why I’m a big fan of Tesla, especially the Cybertruck. I think its design is cool and futuristic. I always wanted to 3D print a small model of the Cybertruck and put it on my desk. Then I thought I could also put an OLED screen as the windshield and build a cool desk clock out of it. The shape of the truck will make this task easy. I started with that small idea and built on top of it. In the end, here is the result,
The Cyber Clock , A rechargeable battery-powered 1.51-inch transparent OLED clock with accurate internet time and date. It can also measure your room temperature and humidity from an onboard sensor. It can show the battery percentage as well, with a fully 3D-printed Cybertruck body. It also comes with rollable wheels so you can play with it. It is also possible to lock the wheels by tightening screws so it wouldn’t fall from the desk by accident !.
also, I would like to mention that I took inspiration from Flipper Zero UI to design this watch face
Through these instructables, we will learn how to build one yourself and customize it to your time zone. so let’s get started with the cyber clock build.
Parts
- Seeed Studio XIAO ESP32C3
- DHT11 Humidity & Temperature Sensor
- 1.51inch Transparent OLED you will get JST cable, display, and driver board as a kit
- Slide switch
- 500mah 3.7v battery (identical battery with 600mah)
- 30awg wires
- 6CSK Allen M3 x 10mm Screws_
- B-7000 Multi-Purpose Glue
- Super glue
- Kapton tape 10mm
_- 310k Resistors ( you can use both SMD type or through hole resistors for it I am using SMD 0805 Resistors for the voltage divider and 10k through hole for pulling up the DHT11 signal )
Tools
- Allen key
- Soldering iron kit
- Wirecutter
- Glue gun
Used 3D printer
- Anycubic Kobra 2 Neo
Used 3D printing filaments
- Numakers PLA+ Pitch Black
- Numakers PLA+ Pure White
- Numakers PLA+ Light Gray”