
“A late happy new year, everyone!
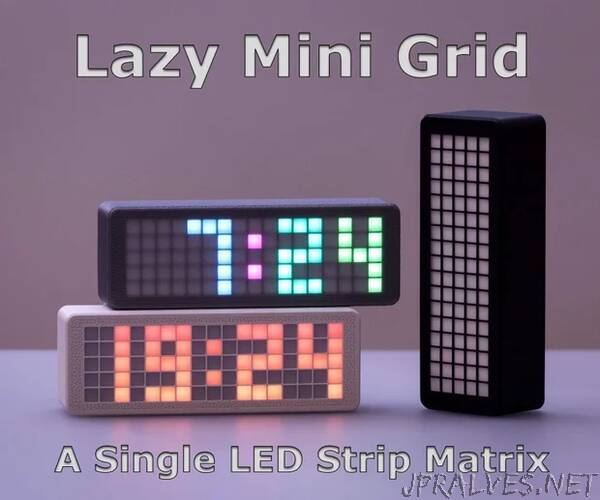
Here’s another LED grid. The ones I built so far always used LED strips with either 60 or 30 LEDs/meter. And so does this one, it’s using 60 LEDs/meter, 90 in total (or 1.5m) - resulting in a 5x17 grid and 5 unused LEDs to avoid soldering.
(Actually I designed one using 144 LEDs/m before this one, but that’s a different story and I might add pictures and a few words at the end of this Instructable why that one didn’t work out so well)
The difference to my previous grids is the “offset” introduced to effectively double the density of the grid. The previous one was using 16.675mm cell size (distance LED center to LED center), this one is using 8.34mm. It is therefore roughly 17% smaller than using LED strips with 100 LEDs/meter or the available WS2812 matrices (8x16, 16x16 and so on).
I had people request smaller versions of the Lazy Grid Clock v2 - but that simply doesn’t work so easy. The 11 LEDs on that one are spaced 183.4mm apart, so it simply does not fit printers like the Prusa Mini. And cutting away one row/column doesn’t work either, there wouldn’t be any spacing left between left/right or upper/lower digits. Simply splitting it in multiple parts isn’t an option for various reasons.
So one of the design goals was to come up with an LED grid which can be printed using a build volume as low as 150mm x 150mm x 40mm (the optional stand is printed in vase mode and can be scaled easily, it’s 90mm tall by default).
The biggest footprint is to be found on the case, it’s 162.24mm x 56.69mm x 40mm and rotated by 45° it’s 149.63mm x 149.63mm (148.8mm x 148.8mm for the thin variant). So you might have to adjust your skirt/prime settings but that’s outside the scope of this Instructable.
It is a pretty tight fit and I don’t recommend this to beginners for various reasons. The clock sketch that can be seen in the pictures has to be taken from my ClockSketch v7-Instructable, I highly recommend reading that one before building any of my designs.
As this Instructable is in essence just about a case/LED frame it will be rather short. It’ll include the basic information to get started, that’s it.
Supplies
Printed parts:
1x LMGv1-Case.STL or LMGv1-Case-Thin.STL)
1x LMGv1-Diff_Grid.STL
1x LMGv1-Elec_Case_All.STL
1x LMGv1-LED_Frame.STL
1x LMGv1-Spring_Clip_Things.STL
1x LMGv1-Stand.STL (optional)
I recommend printing all parts except the case/stand using opaque black material. I’ve used yellow PLA for the spring clip things to improve visibility in the pictures. Case should work in many different colors except very transparent/clear ones where the diffusers corners might shine through.
All parts summed up consume roughly 110g-130g (PLA). Lots of potential to shave off some print time and material by optimizing (like 1 perimeter is enough for the LED frame, it really doesn’t require any infill / top layers and so on). I printed all the parts using 0.25mm layer height. Except for the outside parts (case/stand) going finer doesn’t really improve anything. Print times can range anywhere from 5h to 15h, depending on your settings.
All walls are multiples of 0.5mm, so I recommend using an appropiate extrusion width.
No supports required, some tiny overhangs.
Note: LMGv1-Case-Thin.STL is using multiples of 0.4mm in case you want the front grid of the case printed with thinner grid lines. It doesn’t really improve anything visually, though…
Note: LMGv1-Case-Modifier.STL can be used to create fuzzy skin on the outside of the case only.
If you want to run the sketch from my ClockSketch-Instructable, this is what I recommend:
Non-printed parts:
90x WS2812B LEDs (60 LEDs/m) (17x5 = 85 used, 5 unused ones, details in CS7-Instructable)
2x diffusive material (coated inkjet film, 3 shown for transparency demo)
1x Microcontroller (Arduino Pro Mini or Nano, other supported ones listed in the ClockSketch v7-Instructable)
1x RTC module (DS3231, ZS-042 or similar, other supported ones listed in the ClockSketch v7-Instructable)
2x 6mm x 6mm momentary push button
1x USB cable
1x M3 6-12mm screw (optional, electronics case lid)
Both diffusers are cut to 144mm x 44mm. Having one of them a bit larger (the one between the LED frame and the diffuser grid) makes things a bit easier later on.”