
“Arduino Nano or ATTiny85 sounds a buzzer if the Tesla is in the garage for more than 30 minutes without being plugged in.
I built this project because my wife and I sometimes forget to plug in our Tesla after parking it in the garage (I forget, she just doesn’t do it). It usually happens when we unload groceries because I wait to plug in until after the bags are out of the trunk, otherwise the charging cable is a trip hazard and the charge plug could get bumped. We tried setting a reminder alarm for 8PM every evening but it eventually became background noise.
I wish Tesla would add some code to their phone app to remind me to plug in the car. This issue has been discussed numerous times on the Tesla forums but nothing has been done. There is a third party “Stats” app that can do the task and a whole lot of other stuff but it costs 50 dollars.
I don’t know how to program phone apps but I can hack together some code that runs on an Arduino. Since only 5 I/O signals are needed, an ATtiny85 microcontroller can do the job although an Arduino Nano can also be used. I’ve provided the schematic and code for both. I have a lot of spare electronic parts so I based the design on the ATTiny85 and other components I already had in stock. This project ended up costing me nothing but time.
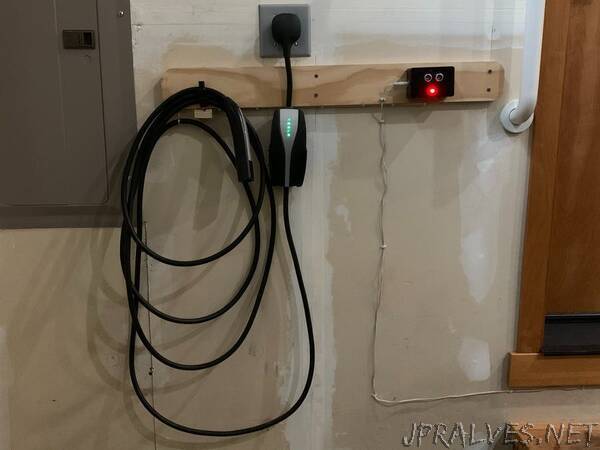
Two sensors are necessary, one to tell if the car is in the garage and the other to tell if the charge cable is hanging on the wall hook. I used an HC-SR04 Ultrasonic distance sensor to tell if the car is in the garage otherwise it reads the large distance over to the opposite wall. The second sensor is a push button switch at the base of the charge cable wall hook. If the switch is depressed, then the cable is hanging on the wall and not plugged into the car.
Obviously you can defeat the system if the charge cables are not on the wall hook and not plugged into the car. I’m not worried about this situation because I would never leave the charge cables in a heap on the floor. My solution also requires that if the car is in the garage, it must always be attached to the charger. I only charge to 80% (unless we’re going on a road trip) but I leave it always plugged in so we don’t gradually loose charge to the “Vampire effect”.
Circuit Description:
A simple active buzzer is turned on by the microcontroller if the car has been in the garage for over 30 minutes and the charge cord is still resting on the wall hook. This gives me plenty of time to unload the vehicle. As a debug aid and a power indicator, an LED blinks to show how many feet the ultrasonic sensor is measuring.
The circuit runs on less than 100ma at 5 volts DC which is provided from a spare wall wart power supply (I never throw them away). If using the Arduino Nano, 5 volts will be provided by the USB cable. When power is applied, the code turns on the buzzer for 1 second to confirm it works.
The main loop, which runs every 10 seconds, reads the pushbutton switch on the wall hook and the HC-SR04 distance measurement. If the car is in the garage and the charge cable is still on the hook, a counter is incremented. Once the counter reaches 30 minutes, the buzzer is turned on.
Two conditions will zero the counter (and turn off the buzzer); if the charge cable is taken off the wall hook or if two consecutive distance readings show the car has left the garage. I was worried that the HC-SR04 might occasionally give a bad (large) distance reading which would zero the counter so I added the requirement for two consecutive readings.
Blinking the LED to show the distance takes 10 seconds and is done at the end of each loop to control the repeat rate. If the distance is under 1 foot, no blinks are given for 10 seconds. If the distance is 10 or more feet, the LED is turned on for 5 seconds and turned off for 5 seconds. For a distance of 1 to 9 feet, the LED is turned on and off at a 1 second rate from 1 to 9 times. Then the LED is left off until the total time has reached 10 seconds.
The ATTiny85 code is called “Attiny_Buzzer.ino” and the Arduino Nano code is called “Arduino_Buzzer.ino”. The code is the same for both, just different comments. Download the code from my GitHub repo.
I used the “ugly wiring” method with a general purpose prototyping board to wire the ATTiny85 as shown below. For an Arduino Nano, the extra parts can be wired “dead bug” style, so no board is needed.”