
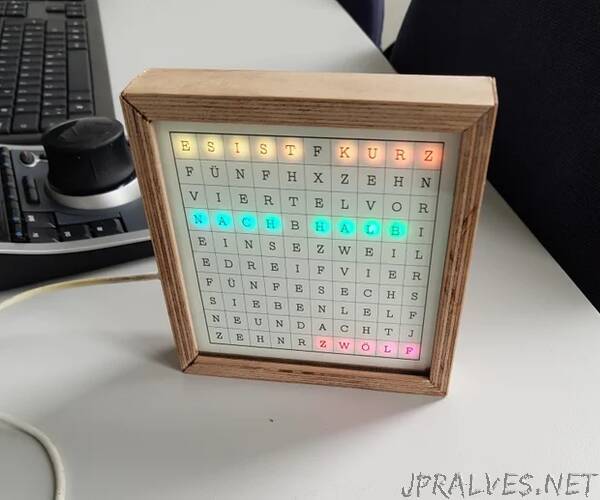
“The Multicolor Word Clock is a Variant of the Wordclocks which takes Advabtage of WS2812 Multicolor LEDs (aka NeoPixel) and the Power of an ESP32.
Whilst other Word Clocks have the Problem that there aren’t enough GPIOs for the Words, the WS2812 only need one GPIO as the Color and so the ON/OFF Info get’s handed from one LED to another by the DataIN/ DOUT Pins on each LED.Logically there is only one long Ribbon of LEDs instead of single Words.
To be able to take full advantage of these LEDs I took an ESP32 with a Webserver to be able to switch color modes without having to flash again.
Surely the Hardware can be altered (I was too lazy to cut out the Letters) but I do like the solution with the printed Paper.
This is my first instructable so be kind ;)
The Code is based on Work of Rui Santos from Randomnerdtutorials.com, the greatest site to learn ESP32.
Supplies:
For the Clock itself I took:
A Bunch of 100 WS2812 LEDs which come as one element by 10x10 LEDs. Beware to test each LED first before building the project. Sometimes some suppliers don’t deliver 100% Quality and you dont’t want a dead pixel in midst of your clock. (I took these: BTF-LIGHTINGWS2812B ECO RGB-Legierung Drähte 5050 SMD Schwarz LED-Chips mit PCB-Kühlkörper (10 mm * 3 mm) WS2811 IC Eingebauter 5050 SMD RGB DC5V 100pcs)
About a meter of soldering wire (0,2mm², I took this one: 0.2mm² 24awg Elektrischer Draht Kabel aus solide verzinntem Kupferdraht 7 Farben je 9 Meter Spule flexible DIY)
Some Wooden Rail, 25x10mmx 500mm.
Some Pieces of Glass (4mm thick) About 2 Pieces each 120x120mm or larger.
A Piece of thin construction board Wood (120x120x2mm)
An ESP32 (mine is from AZ-Delivery)
An Elektrolytic Condensator 1000 µF/6,3 V or bigger
A Resistor about 500Ohms
Some soldering lead
Some Hot Glue
Sensible Tools:
A soldering mat
A “third hand” to fix the Bunch of LEDs
A good soldering Iron about 330 Degrees hot
A good fine wire cutter
Insulation stripping pliers adjustable to the small 2mm² Wire)
A Chop Stick or anything else to push down the Wires
A good set of head worn loupe.
Small tweezers for the Insulation and thick tweezers to bend the Wires.
A breadboard for Testing and a
small mirror so you don’t have to turn around the LED Bunch while debugging.
Something like a mitre square to cut the Corners of the Wood 45° and a cutting saw.
Maybe a 4mm mill
You can see my Setup with two wood blocks (one for the Tools and one to stabilize the Hand)”