
“Since getting an Arduino starter kit I was wondering what to make of all those fancy buttons, shiny LEDs, touchscreen LCD displays… I was thinking about weather station, but I was told that in the maker’s world, weather station is like a “Hello World” app. Like playing “Stairway to Heaven” in a guitar store. Then, when chasing away my kid from oven’s controls for 20th time, it struck me - I could make her a spaceship-like control panel (and I still made a weather station anyway, in a separate project…).
There are plenty of examples of such projects in the Internet, but still, here’s my medium quality stab at it. I didn’t want to stick to just backlit pushbuttons and lever switches. On the other hand, there’s not much point in making a fully-fledged control panel which interacts with Kerbal Space Program for a two year old, does it? Idea was to have something relatively simple at first, but with complexity hidden in software. This way, assuming the target audience is even remotely interested, project could grow in complexity over time.
In the meantime, it would be a nice way to learn things, especially when it comes to mechanics and assembly of things. And boy, did I learn.
Supplies:
Here’s the supply list for the final version of the build.
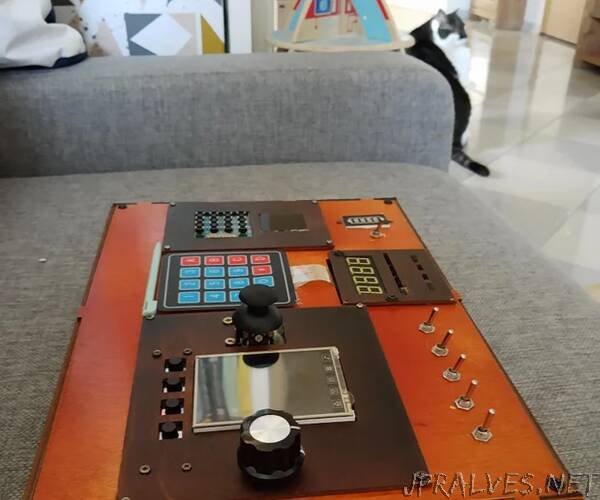
- two Arduino Uno boards (although any other would do just fine)
- 2.8” LCD TFT Arduino shield
- KY-040 Rotary Encoder module (with knob)
- Arduino joystick module
- two MCP23017 I2C GPIO expander modules
- an 8-bit PCF8591 8-bit I2C analog-digital converter module
- LGB LED Arduino module
- Robotdyne 4 digit 7 segment display module
- an 8x8 LED matrix module (as a result of a purchasing mistake, I’m using a Wemos D1 LED matrix shield. Robotdyne’s 8x8 LED matrix is better choice)
- 4x4 keypad module
- 4 tactile push buttons
- 4x4 membrane alphanumeric keypad
- battery level indicator
- 4 lever switches (Single Pole Single Throw or Single Pole Double Throw)
- 2 impulse (on-on) switches
- 1 battery level indicator
- ~30 M2x10 screws
- 4 M3x5 screws
- M3x50 distance bolts
- ~40 female-female DuPont jumper wires
- ~40 female-male DuPont jumper wires
- one of: a couple of prototyping PCBs or a breadboard or a prototyping Arduino shield
- when using prototyping PCBs or Arduino shield - also some wires and connectors
- two 18650 li-ion battery cells with basket
- two 2.1/5 DC barrel jack plugs
- a 2.1/5 DC barrel jack connector for encasing
- 2S BMS circuit for charging the battery cells
- 11 3mm LEDs, different colors
- 4 220R resistors, THT
You can get most of these supplies in one of the Arduino Starter Kits for a reasonable price. Make sure that you’re using LED modules with driver circuits rather than plain LEDs.”