
“Learn how to add a Cellular IoT device to the Raspberry Pi Pico.
I, like most of the maker world, was caught totally by surprise last week when the Raspberry Pi team announced their first microcontroller, the Pico. A custom, dual core, M0+ for 4 bucks? Sign me up!
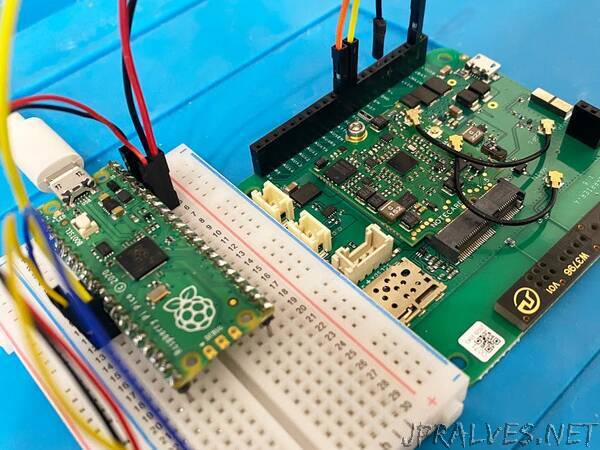
I got my Pico this week and it’s an impressive little device with lots of GPIOs, peripherals, and support for both C and MicroPython. And since the Notecard Python library supports MicroPython, CircuitPython and Python out of the box, I figured I’d wire up the Notecard and show off how you can use the two to add cellular connectivity to your Pico projects.
In this article I’ll show you how to:
Flash MicroPython to a Raspberry Pi Pico.
Wire-up and connect to the Notecard over I2C.
Communicate with the Notecard from MicroPython.
Add a BME680 Temperature and Humidity sensor and send readings to the Notecard and Notehub.io cloud service.
The complete source for this project, including libraries for the notecard and BME680 sensor are in the notecard-pico GitHub repo.
Flashing MicroPython
First things first, I needed to get MicroPython on my Pico. I initially used the UF2 image from the official Pico documentation, but discovered quickly that, as of my initial experiments, that distribution didn’t include the MicroPython ujson library and since the Notecard speaks JSON, and the note-python library depends on JSON support, I had to find an alternative.
Thankfully, the Pimoroni team has a Pico-compatible fork of MicroPython that includes ujson, so I downloaded a recent UF2 from their repo. Then, following the official getting started guide, I held down the BOOTSEL button on the Pico as I plugged the board into USB and dragged the UF2 file onto the RPI-RP2 mass storage device on my machine. And just like that, I was running the Pico with MicroPython.
Note: Support for ujson and other extended MicroPython modules is expected in the official distribution soon!
Saying Hello in the REPL
For creating Pico firmware, the official documentation and guides recommend you use the Thonny IDE, which seems like a nice tool, but since I use VS Code for Python and CircuitPython development, I figured I’d use it for this project as well. I installed a MicroPython extension from the VS Code extensions tab, created a project, and connected to the REPL on the Pico via the /dev/tty.usbmodem0000000000001 Serial-Over-USB port, which feels like the z-index:9999; of device enumeration.
I’ve done some MicroPython work on the ESP32 in the past and one of my favorite things about the experience is the on-device REPL. It just feels so magical to inspect GPIOs and toggle pins while physically connected to a Microcontroller. So as soon as I connected, I imported the machine library and toggled the Pico’s onboard LED, which is at Pin 25.”