
“This hiking data logger is used to record a hike’s location, start and end time, temperature, altitude and barometric pressures. It will also audibly report altitude milestones during the hike.
Even if you have no interest in hiking you may find the schematics, hardware and/or software useful.
The hiking data logger is made up of three separate devices and their Arduino projects.
All of the devices communicate using a HopeRF RFM69CW transceiver.
The three devices:
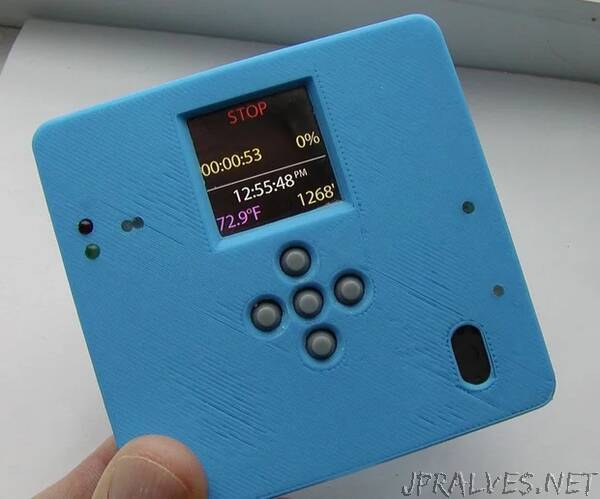
Gateway - resides in your pack’s top pouch.
- Coordinates the recording of hike data.
- 5 button UI with a multi line RGB display
- SD card slot used for downloading saved hike data.
- Provides altitude milestone notification via an onboard MP3 player and micro speaker.
- USB serial and 10440 Li-ion 3.7V 600mAh AAA size battery with onboard charger
- 3D printed enclosure - 8 x 8 x 1.5cm
BMP280 remote - hangs on the back of your pack
- Broadcasts temperature and pressure updates every 4 seconds.
- The gateway and 3 button remote use the pressure readings to calculate the altitude.
- 10440 Li-ion 3.7V 600mAh AAA size battery that lasts several months on a single charge.
- 3D printed enclosure - water resistant - 8 x 5 x 1.5cm
Remote control - resides in an easily accessible pocket
- Controls and displays information about a subset of the gateway’s functions.
- 3 button UI with a multi line RGB display.
- USB serial and 10440 Li-ion 3.7V 600mAh AAA size battery with charger
- 3D printed enclosure with buttons large enough to be used with winter gloves - 8 x 6 x 1.8cm
The gateway stores a summary of up to 125 hikes. After that it overwrites the oldest summary. More detailed hike data can be downloaded to an SD card with each hike stored as a separate file. The detailed data is the temperature and pressure recorded every 4 seconds.
The only software that I didn’t write, other than the basic Arduino classes, are the classes that control the RFM69 transceiver and the SD card.
- Felix Rusu’s RFM69 library Copyright Felix Rusu 2016
- Bill Greiman’s SdFat library Copyright Bill Greiman 2011-2018
My Mac OS utility applications used in this project:
Note that all of the repositories below contain a built application (zip file.)
- SubsetFontCreator - creates a subset of a font for either 1 bit or RGB displays as compressed bitmap data (RGB is antialiased, 1 bit isn’t).
- SerialHexLoader - used to set various parameters on the devices serially and via an ISP, as well as exporting IntelHex representations of binary files.
- FatFsToHex - used to create FAT16 disk images for storing MP3 data on NORFLASH chips.
- HikeLoggerUtility - (not released yet, still being written) used to interpret and display the detailed hike data logged by the gateway. It’s also where hike location names and elevation data is added, edited and exported for loading onto the gateway.
There are no purchased modules other than the transceivers. I designed and built all four boards.
Usage Summary:
Setting the start and end location of a hike is done via the gateway’s UI. Once the setup is done the gateway can be placed in your pack. The 3 button remote is used to start, stop, pause, resume, and mark a hike as done. The only location setting action the 3 button remote can perform is swapping start and end locations (as you would do when going back the way you came.)
The 3 button remote controls a subset of the functions available on the gateway. The remote displays the current time, temperature and altitude. When logging a hike, the remote displays the elapsed time and percentage of the hike completed (in terms of elevation gain or loss.)
What the gateway logs:
The gateway receives a packet from the BMP280 remote approximately every 4 seconds. This packet contains the current barometric pressure and temperature. When logging a hike, this packet data is written to a serial EEPROM IC. When the hike is marked as done (an action in the UI), the log is terminated and setup for the next hike log to be appended. Completed hikes are saved to SD by inserting an SD card. You are prompted with “SAVE TO SD?”. If you then press enter, the logs currently in EEPROM are written as individual files to the SD card. When writing finishes successfully a “SAVED TO SD” message is presented. When you remove the SD card you’re given the option to remove the logs on the EEPROM. You have to explicitly select YES in the UI to do this. Removing the logs from the EEPROM does not affect the stored hike summaries, only the detailed hike log data.
The log data files are interpreted using the HikeLoggerUtility application on the Mac (not released yet.) The HikeLoggerUtility uses the pressure readings to calculate the altitude of each sample showing how the temperature changed over time/altitude and how fast you were ascending or descending. The HikeLoggerUtility also allows you to add metadata to the log such as what kind of day it was (cloudy/sunny/snowing/raining/windy), and what you were wearing and whether you were comfortable. I find this helpful in deciding what to wear on a hike in winter weather. You can lookup what you were wearing for an expected starting temperature within a given range.
The summary data that is always stored on the gateway can only be erased via the USB serial port by sending a summary reset command. This erases all summaries stored in the summary ring buffer. Summaries are only stored for hikes that make it past the 75% milestone. This eliminates writing summaries of logs started accidentally. Note that the 75% milestone rule only applies to summaries. All logs, accidental or not, are saved to the SD card.
Milestones reported by the gateway:
The gateway plays an MP3 clip for each milestone reached. The milestones are 25%, 50% and 75%. The milestone granularity can easily be changed in the code to any integer factor of 100. I have my gateway set to play the Mac OS “Glass” sound for all of the milestones. You could play a different MP3 for each milestone. When the MP3 finishes, the MP3 section of the board is powered down to save power.
More detail:
The Gateway Display:
The gateway display is textual, there are no icons. The display resolution, at about 10 points per millimeter, is quite high, higher than many computer monitors. For example my MacBook Pro with a Retina display is about 5 ppmm. For this reason the fonts used are antialiased. At 1.60 USD the 240x240 gateway display is a good value.
XFont class:
I looked at the various Arduino font rendering libraries available and decided to write my own named XFont. The XFont library makes no assumption about the underlying display hardware and font storage. All of the display classes derive from a common base class. The font data can be stored anywhere; Flash, Serial EEPROMs, etc.. You simply need to provide a stream class to access the data. The only storage assumption the font class makes when used in Arduino code is that the header and glyph lookup tables are stored in the MPU’s Flash memory (PROGMEM.) These structures are quite compact.
SubsetFontCreator application:
The font data consumed by XFont is created by my SubsetFontCreator Mac OS application. SubsetFontCreator uses the open source FreeType library to create a compact subset of a font’s available font glyphs, as bitmap data. For example, if you’re writing code for a clock you would only need the 14 glyphs needed to display the time (0 to 9, a colon, and the letters A, M, and P.) The glyph data generated is compressed for both 1 and 8 bit data. See the Readme.md on GitHub for more information about how the data is compressed.
SubsetFontCreator can generate a binary file, a C++ header, or both. The generated header file contains boilerplate code to make incorporating the font into an Arduino sketch easier. The data can be 1 or 8 bit. 1 bit data requires much less space than 8 bit. 8 bit data is for high resolution displays used to generate antialiased text when you have enough memory to store the data. As an example of how storage agnostic the font classes are, the same classes used in the Arduino code are used to create WYSIWYG font samples in SubsetFontCreator Mac OS application. Only a few display and storage subclasses were needed to support the Mac. Being able to debug the font classes on the Mac makes it easier to maintain.
For more information about XFont and SubsetFontCreator see the SubsetFontCreator repository on GitHub.”