
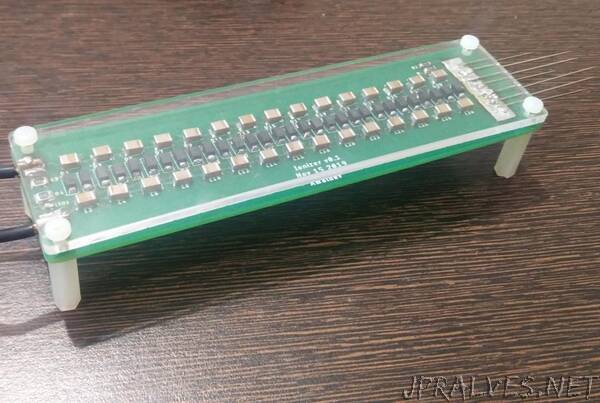
“This is a project which I wanted to do around 2 years back but never got around to building it. It’s nothing too fancy or super high tech. Anyone with some DIY capabilities should be able to pull this off without breaking a sweat. I have open-sourced the entire design, Bill of materials and you should be to order the parts and build one for yourselves in under $10. You can download the hardware files here. Check out the device in action here. Do email me pictures of your build at amaldev.000@gmail.com if you happen to make one. 😀
Back Story
My current apartment in Mumbai is right next to a decently busy road. Ever since I moved in, I have always had the issue of dust settling in every week on everything if I open the windows. Cleaning that up every week is a pain. So I wanted to buy an air purifier for the room. Then I thought, “How hard will be it to build one myself?”. Did some quick research and concluded that I needed to make myself an ionizer(By the way, there is a big difference between an ioniser and a purifier, more on that later in the post). Heck, then life and my other projects got in the way and I never got to build one.
Few people over the last few months have approached me asking how I go about designing and building devices and complex systems(I do take up technology consultancy projects on the side for companies). So I thought I should detail out a relatively simple project, taking everyone through my thought process while building something from scratch.
So let’s start. Let’s build an Ioniser.
Research phase:
To be completely honest, I did this 2 years ago and I sort off knew what I needed to build. But play along with me on this one. 🙂
Start searching on Google on what you want to build. First let’s learn what an ioniser is, what its fundamental principle of operation is. Wiki says
An air ioniser (or negative ion generator or Chizhevsky’s chandelier) is a device that uses high voltage to ionise (electrically charge) air molecules. Negative ions, or anions, are particles with one or more extra electrons, conferring a net negative charge to the particle.
That’s easy enough. If you go on to read the rest of the article, you will find that air ionisers are used to remove particles from the air by imparting a negative charge to the particles and these negatively charged particles get attracted to a positively charged surface(like a wall/ground). Then particles easily settle down(removing itself from the air). That’s cool. That’s exactly what we wanted to do. Remove dust particles from the air so that you don’t breathe that much in.
So from the first 5 mins of searching around, we know that we need to create a high voltage system to impart a negative charge to particles. This information was slightly unsettling to me initially because I haven’t built high voltage systems before and things can go wrong pretty fast if I am not cautious playing with it.
Next, we go ahead and search for devices which are already there in the market based on the same technology. What I am trying to see here is to look at what sort of circuits people have used to build this before. If there is a device in the market using the same tech, learn from it.
People would have put in a lot of engineering man-hours to build that. Learn from that so that you build your system to atleast similar or rather learn from their mistakes and make it better.
Here also, Google is your best resource. I keep seeing that ionisers have been built even in the 1980s. If this tech is that old, then I should look at teardowns of products using this. Search then on google for ioniser teardowns and voila there are lots of videos showing the insides of the device. I would recommend checking BigClive’s videos on this. They are really good.
From these videos, I was able to conclude that a high voltage system can be built with a voltage multiplier and it’s not that intimidating to build one. With this info, lets move on the electrical system design.”