
“Preamble
This Instructable details how to create a non-blocking implementation of the APDS9960 Gesture Sensor using the SparkFun_APDS-9960_Sensor_Arduino_Library.
Introduction
So youre probably asking yourself what is non-blocking? Or even blocking for that matter?
More importantly why is it important to have a non-blocking anything right?
Ok, so when a microprocessor runs a programme it sequentially executes lines of code and in doing so makes calls to and returns from functions according to the order in which you wrote them.
A blocking call is just a call to any kind of functionality that causes a halting of execution, meaning a function call where the caller will not resume execution until the called function is finished executing.
So why is this important?
In the case where you have written some code which needs to regularly execute lots of functions sequentially such as read a temperature, read a button and update a display, should the code to update the display be a blocking call, your system will be unresponsive to button presses and changes in temperature, as the processor will be spending all of it’s time waiting for the display to update and not reading the button status or latest temperature.
For my part I want to create an MQTT over WiFi capable IoT desktop device which reads both local and remote temp/humidity values, ambient light levels, barometric pressure, keeps track of time, display all these parameters on an LCD, log to a uSD card in real time, read button inputs, write to output LEDs and monitor gestures to control things in my IoT infrastructure and all of which to be controlled by an ESP8266-12.
Unfortunately the only two sources of APDS9960 library I could find were the SparkFun and AdaFruit libraries, both of which ripped from application code from Avago (the ADPS9960 manufacturer) and possess a call named readGesture which contains a while(1){}; loop which when used in the project above causes the ESP8266-12E to reset whenever the ADPS9960 sensor became saturated (ie. when an object remained in close proximity, or there was another IR source illuminating the sensor).
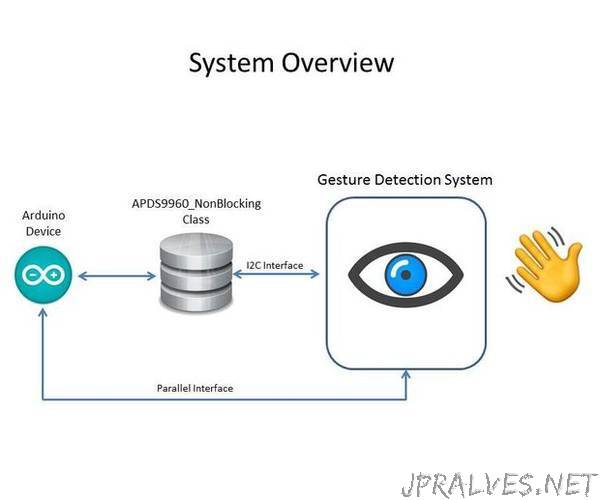
Consequently to resolve this behaviour I chose to move the processing of the Gestures to a second processor whereby the ESP8266-12E became the master microcontroller and this system the slave, as depicted in Pics 1 & 2 above, the System Overview and System Composition diagrams respectively. Pic 3 shows the prototype circuit.
In order to limit the changes I needed to make to my existing code I also wrote a wrapper class/library imaginatively named APDS9960_NonBlocking.
What follows is a detailed explanation of the non-blocking solution.
What Parts Do I Need?
If you want to construct the I2C solution which works with the APDS9960_NonBlocking library you will require the following parts.
1 off ATMega328P here1 off PCF8574P here6 off 10K Resistors here4 off 1K Resistors here1 off 1N914 Diode here1 off PN2222 NPN Transistor here1 off 16MHz crystal here2 off 0.1uF Capacitors here1 off 1000uF Electrolytic Capacitor here1 off 10uF Electrolytic Capacitor here2 off 22pF Capacitors here.
If you want to read the gesture sensor output via the parallel interface then you can drop the PCF8574P and three off 10K resistors.
.
What software do I need?
Arduino IDE 1.6.9.
What skills do I need?
To set the system up, use the source code (provided) and create the necessary circuitry you will need the following;
A minimal grasp of electronics, Knowledge of Arduino and it’s IDE, An understanding of how to programme an embedded Arduino (See Instructable ‘Programming the ATTiny85, ATTiny84 and ATMega328P : Arduino As ISP’) Some Patience..
Topics covered
Brief overview of the circuit Brief overview of the softwareTesting the APDS9960 Gesture Sensing Device Conclusion References”