
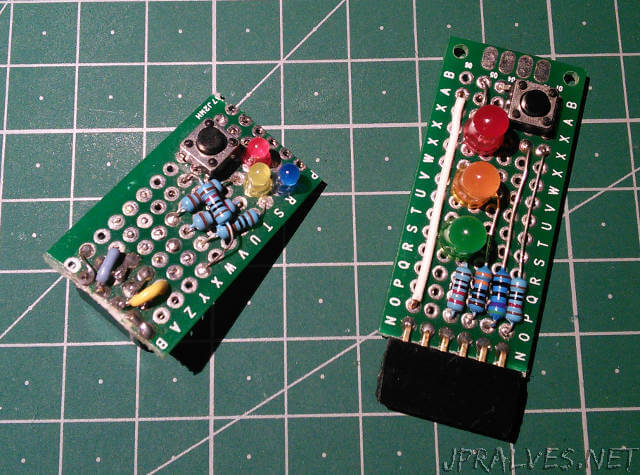
Today we will build a small circuit that lets you execute commands in Raspberry Pi to do whatever we want when a button is pressed (in our case to start the shutdown process). This circuit is quite simple and requires only one resistor and one button. Some LEDs have been added for Raspberry PI to be able to give feedback without having to have a display connected or be connected remotely.
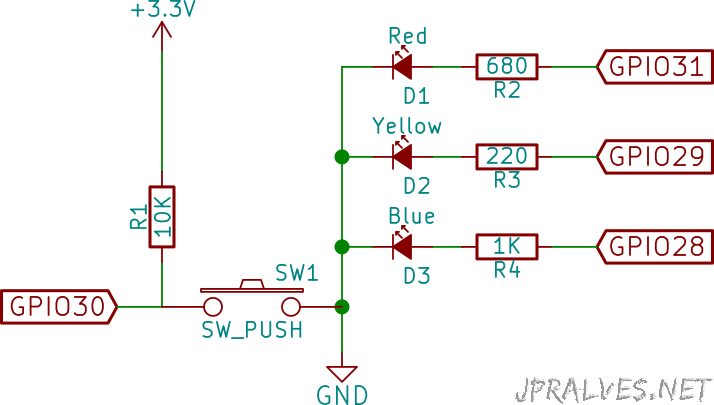
Schematic
Bill of materials (BOM)
Circuit:
- 1x 10K Ohms Resistor (R1)
- 1x SPST Button (SW1)
- 1x 1K Ohms Resistor (R4)
- 1x 220 Ohms Resistor (R3)
- 1x 680 Ohms Resistor (R2)
- 1x 3mm Red LED
- 1x 3mm Blue LED
- 1x 3mm Yellow LED
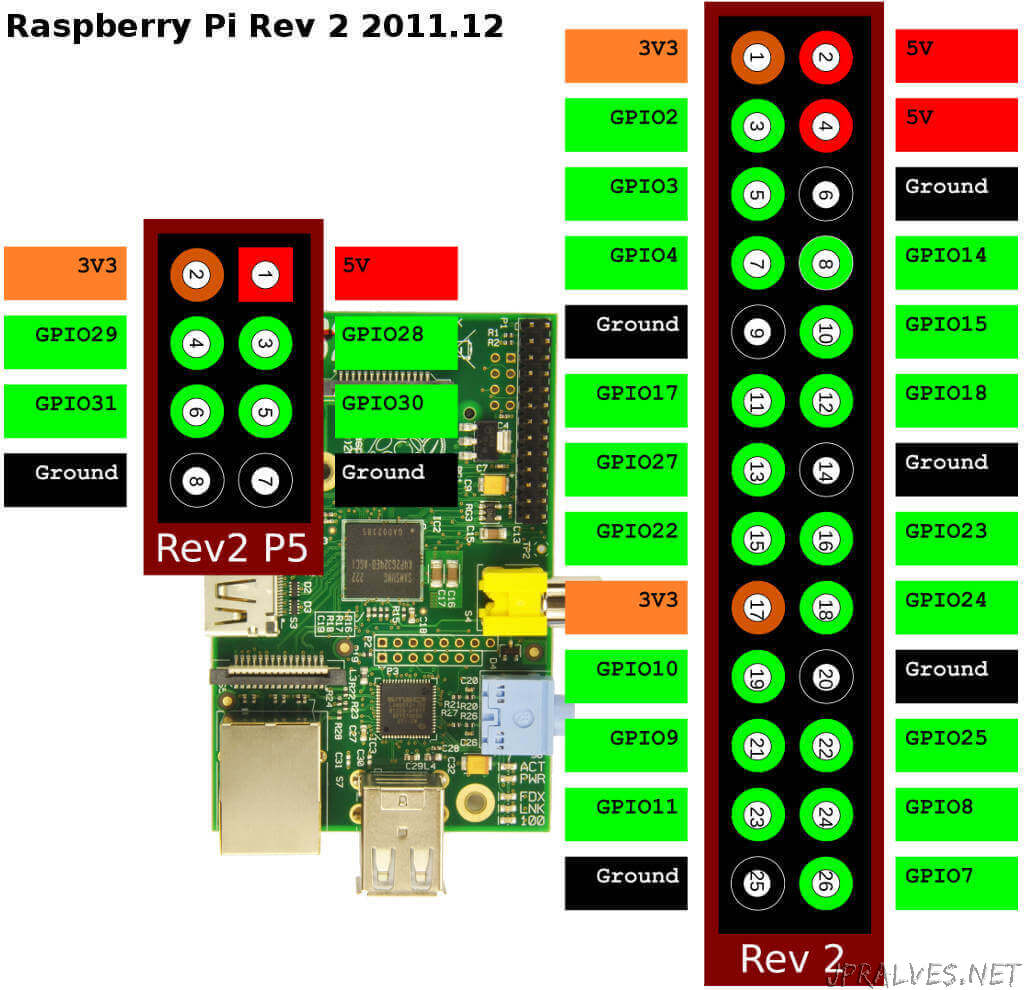
IC/Components Pin-out
The Pinout of Raspberry PI Model B Rev. 2 is as follows:
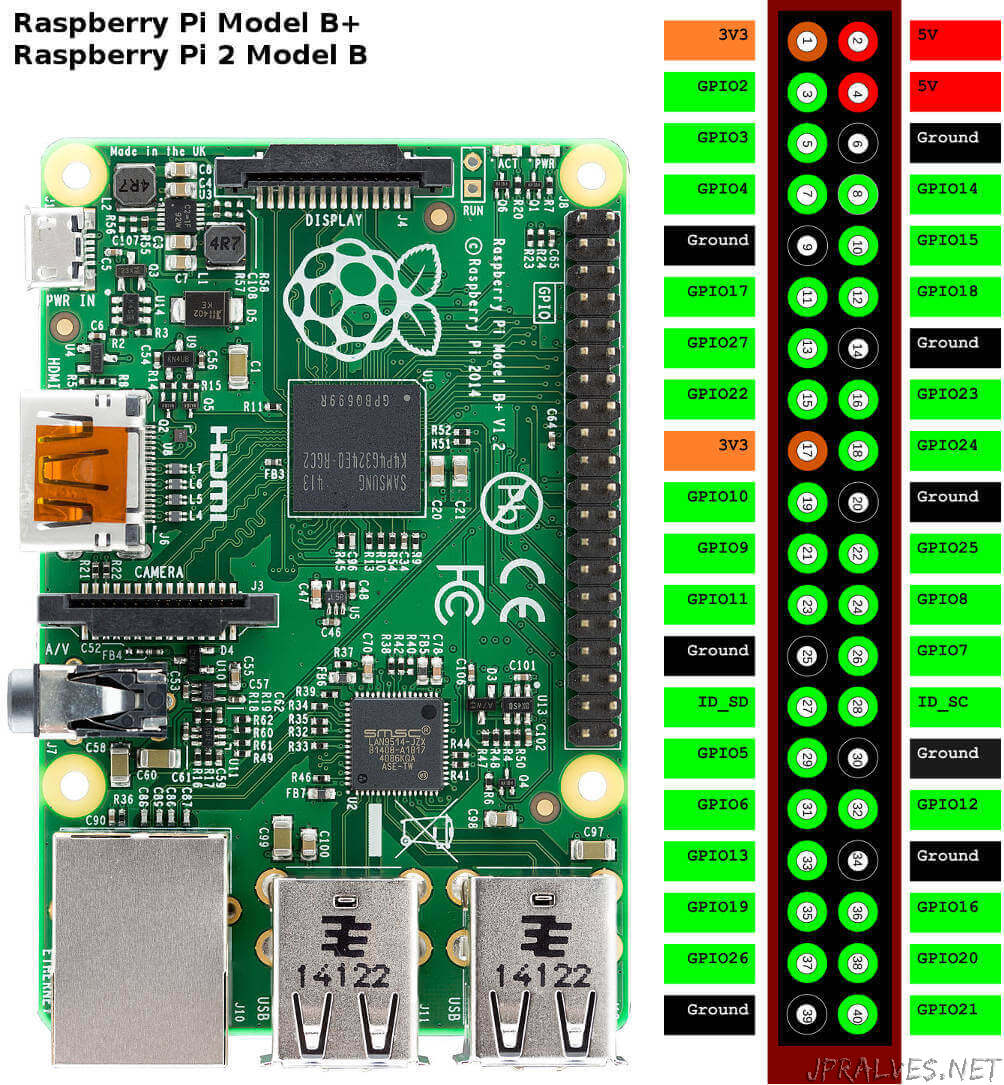
The Raspberry PI 2 Model B Pinout is as follows:
Code
So that the circuit works we will need to execute the “program” that will give the shutdown instruction when it detects that the button was pressed.
The system used to run the displayed code was the raspbian jessie of 2015-09-24 and a Raspberry PI 2 was used. It can be downloaded from here.
If you want to use a script to test only if the button and the LEDs are working:
#!/usr/bin/python
# -*- coding: utf-8 -*-

import RPi.GPIO as GPIO
import time

buttonPin = 30
bluePin = 28
yellowPin = 29
redPin = 31

GPIO.setmode(GPIO.BCM)
GPIO.setup(buttonPin, GPIO.IN, pull_up_down=GPIO.PUD_UP)
GPIO.setup(bluePin, GPIO.OUT)
GPIO.setup(yellowPin, GPIO.OUT)
GPIO.setup(redPin, GPIO.OUT)


def Button(channel):
    print 'button pressed!'


GPIO.add_event_detect(buttonPin, GPIO.FALLING, callback=Button,
                      bouncetime=2000)
try:
    while 1:
        GPIO.output(bluePin, 1)
        time.sleep(1)
        GPIO.output(bluePin, 0)
        GPIO.output(yellowPin, 1)
        time.sleep(1)
        GPIO.output(yellowPin, 0)
        GPIO.output(redPin, 1)
        time.sleep(1)
        GPIO.output(redPin, 0)
except KeyboardInterrupt:

    # If CTRL+C is pressed, exit cleanly:
    GPIO.cleanup()  # cleanup all GPIO
The program for doing shutdown should be created with the filename “/home/pi/gpioshutdown.py”:
#!/usr/bin/python
# -*- coding: utf-8 -*-

import RPi.GPIO as GPIO
import time
import os

buttonPin = 30
bluePin = 28
yellowPin = 29
redPin = 31


def Int_shutdown(channel):

   # shutdown our Raspberry Pi

    GPIO.output(bluePin, 1)
    os.system('sudo shutdown -h now')


GPIO.setmode(GPIO.BCM)
GPIO.setup(buttonPin, GPIO.IN, pull_up_down=GPIO.PUD_UP)
GPIO.setup(bluePin, GPIO.OUT)
GPIO.setup(yellowPin, GPIO.OUT)
GPIO.setup(redPin, GPIO.OUT)

GPIO.add_event_detect(buttonPin, GPIO.FALLING, callback=Int_shutdown,
                      bouncetime=2000)

GPIO.output(yellowPin, 1)
while 1:
    time.sleep(1)
Note: If this is placed in another directory, you must adjust the path in the next step.
The script has been parameterized to use the following GPIO:
- Yellow LED: 29
- Red LED: 31
- Blue LED: 28
- Button: 30
This setting works on the Raspberry PI rev 2 card that has the second row of pins (header).
To use the pins of the main header the following change must be made:
buttonPin = 17
bluePin = 2
yellowPin = 3
redPin = 4
And these reflect the pins of the main header.
Finally, to activate it, you need to edit the /etc/rc.local file and add the following line before exit 0:
python /home/pi/gpioshutdown.py &
At this point you should restart the Raspberry Pi.