
“This Project Aims Weather Monitoring,predicting and Analyzing using DHT11 sensor and ThingSpeak along with Algorithms.
Abstract:
The Internet of Things (IoT) project on the DHT22 sensor provides a way to measure and monitor temperature and humidity in a variety of environments. This project involves using a DHT22 sensor to measure temperature and humidity, and then storing the data in a database for further analysis. The data can then be used to make decisions about climate control in a building, or to alert users when the environment is not suitable for their needs. Additionally, the data can be used to track trends in weather and climate over time, allowing for more informed decisions about how to best use resources for energy efficiency.
Introduction:
DHT22 sensor is a digital humidity and temperature sensor. It is a low-cost, low-power device that is ideal for use in Internet of Things (IoT) projects. The DHT22 sensor measures temperature and humidity in the environment, and can be used to provide real-time feedback to users on their current environment. It can be used in applications such as monitoring temperature and humidity in a home, office, greenhouse, factory, or even in a vehicle. The DHT22 sensor is designed to work with an ESP module, which is a low-cost, low power microcontroller with built-in WiFi capabilities. The ESP module is capable of connecting to a local area network (LAN) or the internet, allowing it to send data from the DHT22 sensor to a web service or cloud platform for further analysis and action. By using the DHT22 sensor with an ESP module, developers are able to quickly and easily create IoT projects with real-time monitoring capabilities.
Motivation:
The Internet of Things (IoT) is rapidly changing the way we interact with our environment, allowing us to monitor and control a wide range of systems and devices with unprecedented ease. By using a DHT22 sensor, we can create an IoT-based weather monitoring system that can measure temperature, humidity and other environmental factors in real-time. This system can then be used to alert users of any sudden changes, allowing them to take appropriate action such as closing windows or using air conditioners before the temperature and humidity become unbearable.
Objectives:
- Develop an IOT-based weather monitoring system using DHT22
- sensor, capable of providing real-time data on temperature and humidity.
- Predict the upcoming days weather Condition in Advance.
- Create a dashboard to display the data collected from the sensor.
- Design a user-friendly interface dashboard to enable easy access to the data.
- Integrate automated alerts and notifications to alert the user when the temperature or humidity reaches certain thresholds.
- Develop an algorithm to analyze the data collected from the sensor and display the results.
Implementation:
Preprocessing
NodeMCU(esp8266)
- Check the power supply of the ESP8266 module and make sure it is compatible with the voltage requirements of the module.
- Connect the ESP8266 module to the computer via USB cable.
- Download the latest firmware for the module and install it.
- Configure the SSID and other parameters such as channel, encryption type, IP address, etc. for the ESP8266 module.
- Set up the serial communication interface between the ESP8266 module and the computer.
- Check the AT commands of the module to make sure that it is working properly.
- Test the ESP8266 module with a simple program.
DHT11 Sensor
- Connect the DHT22 to the ESP8266 module
- Import the necessary library for the DHT22 sensor.
- Configure the pin and other parameters of the DHT22 sensor.
- Read the temperature and humidity data from the DHT22 sensor.
- Save the data to a things speak and display it on the serial monitor.
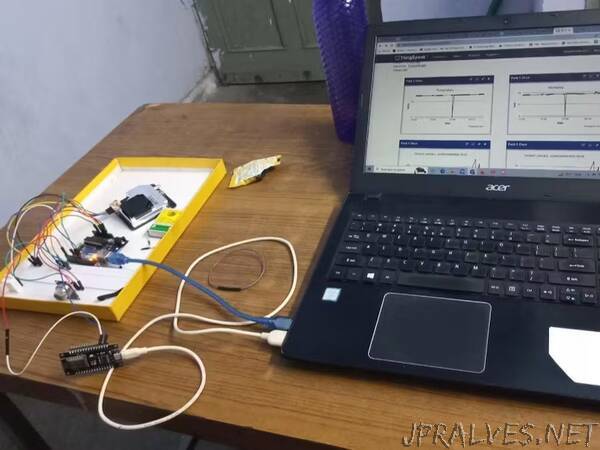
Circuit Connections and Process:
- Connect the circuit as per the instruction:
- Connect ESP8266 Module Gnd Pin to breadboard ground pin.
- Connect RX pin of ESP8266 to RX pin of Arduino uno.
- Connect A0 pin of MQ2 with A0 pin of Arduino uno.
- Connect Gnd Pin of MQ2 with breadboard grd.
- Connect VCC pin of MQ2 with 5V Arduino uno pin.
- Connect Gnd Pin of DHT22 to Gnd of Breadboard.
- Connect Data Pin of DHT22 to Pin 8 of Arduino Uno.
- Connect VCC Pin of DHT22 to 5V of Breadboard.
- Connect TX Pin of PM SENSOR SDS011 to pin 10 of Arduino uno.
- Connect RX Pin of PM SENSOR SDS011 to pin 11 of Arduino Uno.
- Connect Gnd Pin of PM SENSOR SDS011 to Gnd of Breadboard.
- Connect 5V of PM SENSOR SDS011 to 5V of Breadboard.
- Connect one Gnd pin of Arduino uno to Gnd of Breadboard and another Gnd pin of Arduino uno to 5V of Breadboard.
- Now Create an account in ThingSpeak and create a channel. Add Five fields for Temperature, Humidity, Detect dust smoke PM2.5 ,Detect dust smoke PM10 And Gas smoke field. Copy the API key and paste it in the ‘apiKey’ string.
- You can add widgets for displaying all the data.
- Change ‘ssid’ and ‘pass’ character with your WiFi name and password respectively.
- Further Analyze all the data and then Apply Algorithm to predict the upcoming days weather conditions.”