
“Do you want to build a uninterruptible power supply (UPS) system which will keep your Raspberry Pi 4B online 24/7/365 without hassle?
This isn’t one of those gimmicky tutorials which uses a tiny cell phone charger with an 18650 battery built in that is technically capable of powering a potato…
No, I’m using some heavy duty materials which will feed the power hungry Raspberry Pi 4B, 24/7. I see many tutorials online for building a Raspberry Pi UPS with different components. But I am a person who likes to do things as simply as possible. That is why this design has no complicated wiring. Since no soldering iron is needed, it is safe for kids, and for people who have a very basic knowledge of electronics.
Do you know what the best part about this whole project is? If you want to power your Raspberry Pi with solar energy, simply swap the DC power supply to the controller with a solar panel! In fact, the controller was designed for solar power; this will not affect the project should you choose to use a DC power supply.
Total cost: (Not including taxes)
With solar panel, buying needed parts new, online: $149.81
IF SHOPPING AROUND: (estimate)
With solar panel: $100-$125
With laptop charger: $30-$56
(If you want to get stuff cheaper, shop around! Getting only the parts you need at your local hardware store, or even thrift stores will save you lots of money!)
Supplies:
All of the parts used in this tutorial, are listed in order, with their links highlighted. I have inserted the lowest cost, highest quality listings I have been able to find which seem to be stable. If the link no longer works, please notify me in the comments. Feel free to find other components which match the features of the ones featured here. I encourage you to check other websites as they often can have components for a lower price.
1. 10A PWM SOLAR CHARGE CONTROLLER. $12.99
Check THIS LINK first to see if there are cheaper ones on eBay.
This is the heart of our build. This device not only charges the battery, but it also keeps the battery at float voltage, so that means it can be left connected to the battery indefinitely without worry of damaging the battery from overcharging. It provides constant power to the load device (in out case a Raspberry Pi) and keeps it powered, so that when the sun goes down, the Raspberry Pi stays on.
The charge controller will automatically disconnect outgoing power to the Raspberry Pi is the battery voltage drops below 10.7 volts. This protects the battery from damage due to undercharging. This should not happen unless your power goes out for more than 14-20 hours, or if you are using a low wattage solar panel on a cloudy day.
2. THE BATTERY $23.99
This is a high capacity Lead Acid battery relative to our Raspberry Pi 4B’s power requirements. In my tests, this battery kept the Pi (at just above idle) on for 24.2 hours before the charge controller automatically disconnected the power to the Pi. At this point, the battery needed recharging.
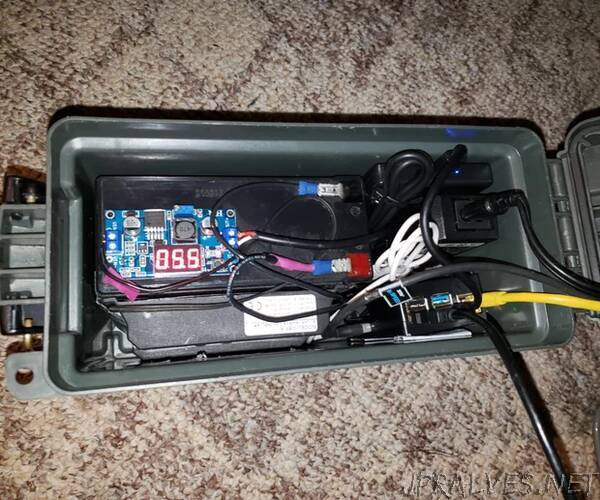
3. 3A Buck Converter (With LCD). $5.75
This device, called a “buck converter”, steps down voltage coming from a power source, such as a 12v lead acid battery, and converts it to 5 volts, the same voltage that all USB devices run on. I used to have one with a set voltage and an inline fuse, but I found the tolerances of the set voltage to be simply too wide. The new one is fully adjustable and even has a handy LCD to check on the output voltage. Simply turn the screw counter clockwise until it reaches 5.5 volts. You may need to strip back the USB C cable to attach the power leads directly to the output of the buck converter, unless you have a USB female adapter lying around.
IF YOU WANT GO SOLAR:
4. SOLAR PANEL- $78.50 -
Please read:
Yes, this is a 100 watt solar panel. Complete overkill, I know. I used a 40 watt I had laying in my closet, but I cannot find any decent 40-50 watt polycrystaline panels which are priced below $70, which I would feel comfortable recommending to you, so for $78.50 you really can’t argue against an extra 50 watts of power. Using this panel, you may even use two 10 AH batteries connected in parallel for double the runtime!
If you have a supplier which is able to provide you with a 40 watt or above solar panel for a reasonable price, feel free to buy that. Please be sure that the solar panel will output 18 volts, and that it is not internally regulated to 12 volts, otherwise the solar charge controller will not charge the battery.
I cannot recommend buying a folding solar panel, especially if you plan on building this project to run 24/7 as the folding solar panels available don’t really have much in the way of a permanent mount; they’re designed to be mobile.
DC POWER SUPPLY:
LAPTOP CHARGER $12.58
Yes, it is a plain old laptop charger. But do you remember how the charge controller was called a Solar Charge Controller? It was designed for power input from solar panels! It just so happens that solar panels put out the same voltage range (18-24v) as most laptop chargers! So this means that we can use the laptop charger to directly connect to our charge controller, in turn the battery and any connected loads. Feel free to use any old laptop chargers you may have laying around, so long as they do not exceed 25 volts and 10 amps. This is the setup I use.
ADDITIONAL ITEMS YOU MAY ALREADY HAVE:
5. FEMALE DISCONNECT - Amazon $8.59
These are the plugs that connect to the terminals on top of the battery. They are crimped to the 14 gauge wire which connects to the charge controller. Additional eBay link: Female disconnects - eBay (usually cheaper)
6. 14 Guage Wire. $18.49
This runs between the battery and the charge controller.
Please use your own wire or use an old extension cord, because buying a whole spool of wire which costs $18.49 if you’ll only use it for one project seems way overkill, considering that you can often find wire at the hardware store for $0.39 per 12 inches, or even at the recycling center for free. Only use however much you need.
(PRO TIP: You can also use lamp wire!)
TOOLS NEEDED:
Multimeter - Crimps (or pliers) - wire strippers - wire cutters (or scissors) - hot glue gun - electrical tape”