
“Many electronic tuning devices are on the market. The cheaper ones are designed for specific instruments (such as guitar, violin). The more expensive ones often are called ‘orchestral tuner’, piano tuning included. For example, the Korg OT-120 (€ 62) or the Seiko SMP100 (€ 59). Considering the prices of tuners specifically for harpsichords and pianos, I suppose they are targeted at professionals: For instance the Jahn CTS-5-C (€ 718), Jahn CTS-7-C (€ 979) and Jahn CTS-7-CE (€ 1390). All these latter models have at least two displays: the one showing the deviation in cents (which will be explained later), note name and frequency, and the other display showing a stroboscopic indicator (indicating whether you’re tuning too low or too high).
The main difference with the different models is precision: Jahn its detection accuracy is 0.1 cents, opposed to 1.5 cents for Korg. For pianos, accuracy counts! This has to do with tuning in a particular temperament, which will be explained later. I consider that currently for non-professional piano owners an affordable tuning assistent isn’t available. They are either not precise enough or way to expensive. But there is more to the story.
Cheap or expensive, all aboved mentioned tuners have something in common: they have one or more displays, showing your progress. Both the Korg and Seiko models contain a needle-type gauge, the intended frequency in the center of the range. In my opinion, this is a bad idea, because at any angle but 90 degrees, you cannot exactly see the correct position (parallax effect). In general, l think that inspecting some display differs from what old school piano tuners always and only do: they listen to the progress. And for a good reason. The end result must sound well!
Therefore I decided to develop a new device that (1) is affordable, (2) still very precise, (3) easy to use for non-professionals, and (4) does it job without visual clues. And that is what this device does: It generates the required frequencies at a very high precision and renders this to the (grand) piano by means of a transducer, a contact loudspeaker. Just listen and tune the strings equally, which is pretty straightforward.
Supplies:
At the core of this project is an Arduino microprocessor, AD9833 synthesizer (breakout board), two small amplifiers and a few electronic components such as two potmeters, a voltage regulator, wiring, three rotary switches, one capacitor, one resistor, cooling element, a DIN connector and a small Veroboard-like PCB. The rest is interface related: enclosure, loudspeaker / transducer, battery holder, on/off switch and five knobs. As with any prototype, lessons are learned. Probably the most interesting is that it can be cheaper, without loss of functionality. This will be adressed.
Arduino DUE: The DUE is a 32-bit ARM processor. It is chosen for its 32-bit architecture (frequency precision) and enough pins. This is the most expensive component and progessive insight (see Evaluation section) learned that probably a much cheaper 32-bit Arduino also is possible.
AD9833: A ready to use AD9833 breakout board can be achieved for a low price.
Potentiometers: two of approx.10K each, although a somewhat higher value will function also.
PAM8302: Ready to build in amplfier from AdaFruit. The price is below 4 USD, making it nonsense to build the device yourself. But if cost is an issue, clones are available at a much lower price. Two amplifiers reside inside, one for the transducer, the other for the internal loudspeaker. The latter isn’t a must and can be omitted in most cases, together with its volume pot.
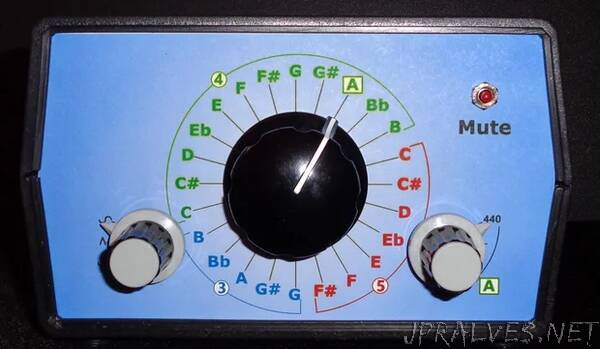
Rotary switches: Two 5-position switches are used for selecting a frequency for A4 and for the wave outputs. The 24-position is for tone selection. Finding an affordable 24-position switch isn’t easy. For instance, I found the cheapest Elma Type04 rotary switch (one deck only!) at don-audio.com for ‘only’ 48 Euro (approx. 56 USD). The same shop (as does this one) also offers a much cheaper model (approx. 11 Euro, with the required two decks), which I used. Evaluation learned that a more common 12-position rotary switch might be a good alternative. The 5-position switch for wave output selection may be omitted too, because sine waves only are sufficient.
Knobs: Two for the volume pots and three for the rotary switches.
Transducer: A transducer is a speaker that directly transfers audio movements to the object where it is placed on. The used model is AdaFruit’s Medium Surface Transducer. I glued it directly on the soundboard of my piano. Use a good glue (vibrations!), I chose Araldite. The effect is that the sound comes from inside the piano, as if a string is sounding. Of course, any other place (without glueing) can be found with a little experimenting.
DIN connector: For connecting the external transducer
Loudspeaker: An internal loudspeaker was added at the bottom of the housing, although it perhaps may be omitted, together with its amplifier and volume pot.
STM LD1117V33: This is a voltage regulator. You’ll need it to convert to 9V battery power to 3.3V for the circuitry, ecxept the DUE. The Arduino DUE requires an input voltage of 7-12V.
Capacitor: A small 10uF electrolytic at the output of the voltage regulator for stabilization.
Resistors: 10K at the Flip-Flop and 27K mounted between the wave output switch and amplifiers, for dimming the square wave level coming from the AD9833. The latter can be omitted if only sine waves are sufficient.
CD4013BE Dual D-Type Flip-Flop: A Flip-Flop is a component that switches between two states: ON and OFF, which is the same as zero volt or a positive one at the output. The Mute switch triggers this component each time in the opposite state. Its specifications can be found at https://www.ti.com/lit/ds/symlink/cd4013b.pdf.
Mute switch: a common momentary switch, mounted at the front.
On/Off toggle swicth, mounted at the back.
Enclosure: Any case will do, but remember, the scale at the interface for the 24-position rotary switch requires some height to be read without errors. From a distance, when printed small, and perhaps in a somewhat dark room, the letters E and F look quite similar. The current height is 8.3cm (3.26”) which I recommend for the project.
Bulgin 9V battery holder: Mounted at the back, enables battery swapping externally.”