
“Imagine you are sitting at your workbench, satisfied, playing a game you made yourself. That’s what this project shows you how to do.
I was looking for things to make with an arduino, and I stumbled across this project by author courtlandjensen. I followed the steps listed in the article, and made an LED whack-a-mole game.
However, the code required that the joystick be pressed all the way to one of the sides, and that wasn’t suitable for me. So I edited the code, did the math, and made it so that you have to be in the top/bottom/left/right 3/8ths of the full motion path to trigger a location.
This worked great, but I still wasn’t satisfied.
So I added a function that turns all of the lights on for 1 second then kills the program. I then connected that to the incorrect choice code, added detection and fail counting, and made it so if you fail 3 times in a row, you lose.
But that STILL wasn’t enough.
So I made it adapt as you play. It speeds up and slows down depending on how well you are doing. Also, while I was at it, I recoded the random generation so it is as near truly random as I could possibly do.
I also added user variables that the builder can customize, so if you are new to Arduino you can customize the game without getting into the more complex code.
HOW THE GAME WORKS
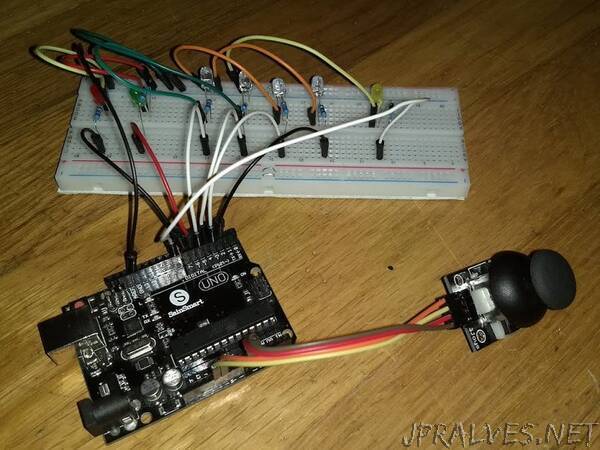
This “Whack-a-mole” game uses 7 LED’s, and a joystick. There are 4 “moles”, represented by the 2nd, 3rd, 4th, and 5th lights from the left on my board. One of the four lights will randomly light up and give a set amount of time to hit the corresponding direction on the joystick. I have arranged my lights so that, from left to right, the selections on the joystick are: up, left, right, down. This is just the convention that I chose, so be creative and try other ones!
The two lights on the left are red and green, which indicate a incorrect or correct choice. The yellow light to the far right blinks the count for the current high score, and it indicates the score every time a run is over (whenever a wrong choice is made). Naturally, a new high score replaces the old one.
If you get 3 (editable) wrong choices, you lose the game. To start again, just press ‘reset’ on your board.
INSTRUCTIONS
To make this, connect the components exactly like the schematic shows.
Open your Arduino IDE and copy+paste the code into a new project. Compile and upload to the arduino, and you are ready to go.
GOING FURTHER
If you aren’t experienced with Arduino code, but don’t like one of the gameplay aspects, open up the file in your IDE again. Now look at lines 4-8. I attempted to explain each of these numbers so a beginner can understand. If you don’t understand, change those 3 numbers at random until you get what you like.”