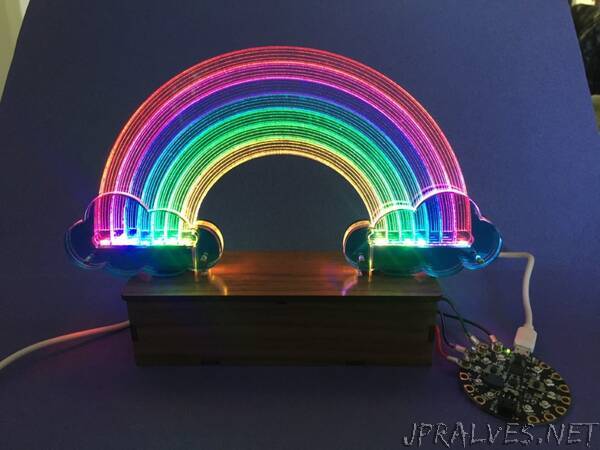
“Light prefers to take the shortest path, but under the right conditions you can make it bend and bounce, generating lovely effects in the process. This project takes advantage of some special properties of acrylic. Inside polished acrylic, light rays reflect off the smooth inner surfaces, preferring to escape at the rougher edges or scatter at imperfections in the surface. This internal reflection causes the light to suffuse the entire acrylic shape with a subtle uniform glow, even where it bends and curves.
We can take advantage of light scattering by engraving patterns into the smooth surface of acrylic sheet then illuminating the sheet to generate a brighter glow at the etched spots. These edge-lighting effects are often seen in signage or décor used in dark venues (see “LED Nixie,” Make: Volume 66).
The edge-lit rainbow juxtaposes seven separate acrylic “arcs” and illuminates each one individually with RGB LEDs so that each arc glows with its own colors, independent of its neighbors. This project takes the effect one step further, giving both ends of each arc separate RGB LEDs to generate a color mixing effect.
There are many possible ways to control RGB LEDs, so I made this project versatile by attaching the LED strips to a JST connector, allowing it to be easily powered by interchangeable microcontrollers. This build explores ways to illuminate the rainbow using CircuitPython code on a Circuit Playground Express for quick programming and interactive color-mixing, as well as an ESP8266 board for IoT connectivity and a colorful report on real-time weather conditions.
MATERIALS
- Circuit Playground Express or Adafruit Feather Huzzah ESP8266 or other microcontroller capable of controlling RGB LED strips. For the full weather display functionality, you’ll want the Huzzah or another microcontroller with Wi-Fi.
- RGB LED strip, SK6812 type, 3535 size, white with a pixel density of 144 LEDs/meter, such as Adafruit #2969 (adafruit.com) or SparkFun #14732 (sparkfun.com)
- Clear acrylic sheet, ¼” thick, 6″×10″ or larger
- Clear acrylic sheet, 1/8″ thick, 5″×5″ or larger
- Translucent blue acrylic sheet, 1/8″ thick, 8″×5″ or larger
- Wood sheet, 1/8″ thick, 8″×12″ or larger for the laser-cut enclosure. I found a nice selection of laserable wood sheets at Johnson Plastics johnsonplastics.com/engraving/sheet/laser/wood and used a lovely walnut veneer for this project.
- Copper tape, 3/16″
- Wood glue
- Machine screws, M2×16mm (4) with nuts
- Hookup wire, 26 AWG solid insulated, white
- Heat-shrink tubing
OPTIONAL:
- JST connectors, 4-pin: male (1) and female (1)
- Painter’s tape very helpful
- Crimp ring terminals, M3 uninsulated (4)
- JB Weld epoxy or similar glue that can adhere to plastic and wood
- Sharpie markers: red, black, and blue”
