
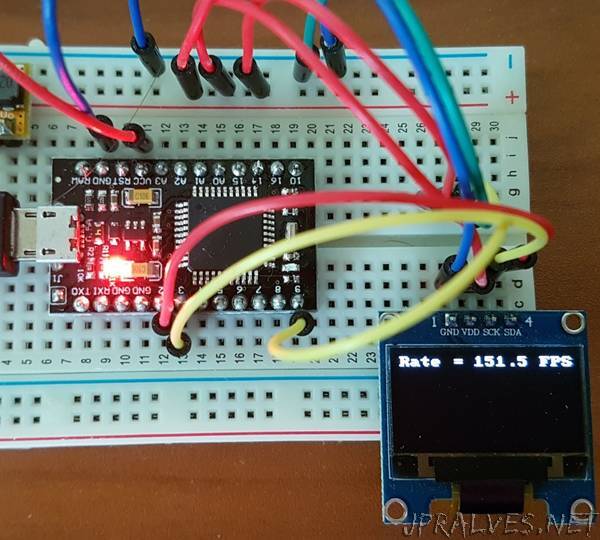
“The SSD1306 OLED displays are very popular with hobbyists due to their low cost and easy interfacing. The majority of the ones sold expose a two wire interface (TWI) aka I2C. The default speed for I2C is 100Khz and the “fast” mode is 400Khz. These are the 2 standard speeds supported by most AVR Arduinos. An I2C clock rate of around 800Khz is also possible on AVR MCUs, but not supported directly by the Wire library. The I2C standard recently added some higher speeds (1Mhz and 3.4Mhz). The 3.4Mhz version uses a slightly different protocol. At 400Khz, using the I2C hardware and the Wire library, I was able to refresh the display around 23.5 frames per second (FPS) with my code.
Why
I have already written a SSD1306 library for both Linux and Arduino, but I wanted to drive the display from an ATtiny85 and learn about the I2C protocol in the process. The ATtiny85 doesn’t have I2C hardware built in, so it needs to be emulated in software using GPIO pins. There are several public domain libraries available (e.g. TinyWireM), but I wanted to see how much code is necessary to talk to a write-only I2C device and how well I could optimize it. The SSD1306 OLED controller also supports a 10Mhz SPI interface, so I assumed that the I2C interface on these displays could probably be driven faster than “spec” and not have any major issues. The code I created is not necessarily practical, nor the ‘right’ way to do it, but I wanted to see how fast I could get it in C/C++ without having to write it in AVR assembly language.
Caution: For this experiment, I’m running the AVR at 16Mhz with a Vcc of 4.5V. I connected the GPIO lines and Vcc directly to the SSD1306. Running at this voltage can damage the OLED display. I should have used level translators to get Vcc and the 2 data lines down to 3.3v. If you run this code on an AVR pre-configured for 8Mhz and 3.3v, you’ll see performance of half the values I measured.
How
I grabbed a copy of the I2C protocol specification (Rev 6, April 4, 2014) which is apparently owned by NXP Semiconductors. The condensed version is that there is typically one master and one or more slave devices on the bus (data + clock lines, aka SDA + SCL). The signal lines are normally pulled up to VCC and in tri-state (high impedance). When the master wants to begin a transaction, it sets the lines as output signals and follows the protocol. There is an acknowledge bit that gets sent back from the slave to the master after each byte is sent to signal that it was received successfully. I was curious if this could be ignored and for the SSD1306, it doesn’t seem to care. This meant that I could leave the SDA and SCL lines as outputs the whole time I was writing data. Before anyone starts to complain that I’m not following the spec, for this project I’m not interested in creating a 100% compliant I2C protocol emulator, I just want to see how fast I can push the SSD1306 by bit-banging the data into the I2C pins.
First Try
For my first pass, I followed the I2C spec precisely and used the pinMode() and digitalWrite() functions for a functional baseline. As a coder, you don’t want too many unknowns to have to debug, so I usually start with the simplest code to get it working. Surprisingly, the code worked the first time and resulted in a display refresh speed of 5.5 FPS. The clock frequency I’m generating varies from byte to byte and bit to bit, but I2C is very forgiving as long as the data is stable during the clock transitions. The speed is not impressive, but that’s not a deterrent because I know that those access GPIO methods are slow. A little background - the AVR MCUs come in a variety of configurations and the GPIO ports are mapped to the pins differently depending on the chip. The pinMode and digitalWrite / digitalRead functions hide those differences by referencing everything as a physical pin number. This makes it easier to port your software from an ATMega328 to an ATtiny85. The downside to using those functions is that they do a bit more than just translate the pin numbers and this causes poor performance. The alternative way to access GPIO on AVRs is to reference the PORT (digital output) and DDR (data direction) registers directly. This makes the code less readable to people unfamiliar with ARV MCUs, but necessary in order to gain the speed.
Second Try
Since my I2C protocol code was working with the slower access method, the next step was to convert it to talk directly to the GPIO ports of the AVR. The AVR MCU has unique instructions to speed up access to I/O ports, so setting or clearing a bit (setting a pin to a high or low level) of a GPIO port can be done with a single instruction and execute in a single clock cycle. After replacing all of the I/O methods, the code was now able to refresh the display at 86.5 FPS. This is an impressive speed, but not unique. I’ve seen existing code on Github which looks similar and probably performs about the same.”