
“A quick internet connected combination lock project for your retro rotary dial!
I’ve had this old retro telephone rotary dial lying around for many years, and my son has asked me over those years if we could make an electronic push button combo lock. So after recently teaching him the basics of C programming, we decided it was time to whip up a crazy project at 1am that made use of this old rotary dial instead of a push button keypad. It’s just so satisfying to dial in a number, and hear the wheel whir counter-clockwise after each digit.
These are how things unfolded:
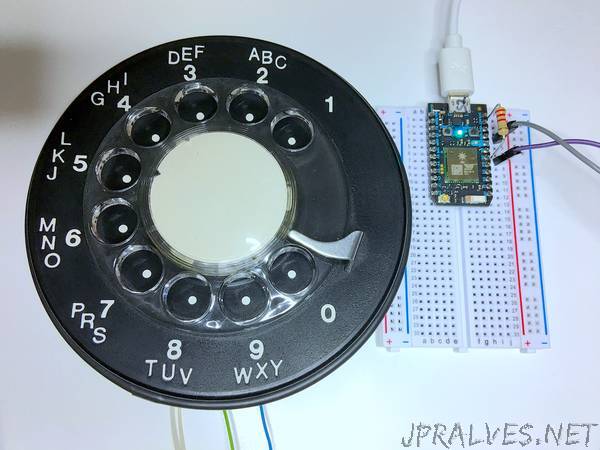
What do these wires do, we asked? Of course I didn’t remember, so we connected a continuity meter and checked the two white wires. They seemed to continuously short together whenever the dial was moving. The blue and green wires were normally shorted together when the wheel wasn’t moving, and would open whenever they passed by a number. So if you dialed a 3, you’d hear the continuity meter stop audibly beeping 3 times. We figured we didn’t need the white wires, but we could use the blue and green wires as a switch input to the Particle Photon microcontroller.
To test this theory, we hooked up a 2.2k ohm pull up resistor between 3.3V on a power supply and the green wire on the dial. The blue wire was connected to of the power supply. This blue-green switch pair now act as the “low” input when the dial is at rest. When the switch opens, the pull-up resistor generates the “high” input. We looked at it with an oscilloscope to see if this mechanical switch was generating any mechanical switch contact bounce that we’d have to filter in software. To our surprise it was generating a clean squarewave that had about a 60ms high time, and 40ms low time between consecutive pulses. This meant our software was going to be dead simple. With this information we starting considering how we would measure and count these pulses to yield an input number to our digital lock.
ONE HOUR LATER we had a working lock with a hard-coded combination number, and 5 minutes after that we added the connectivity of the internet and Wi-Fi capability of the Photon to remotely reprogram the lock combo, and read out what the current combo was whenever we desired. You can browse through the code and read the comments for exactly how everything works. If you have any questions, post them in the comments below and we’ll be happy to answer.
Some notes on improvements that we’re thinking of making, and you can add if you wish:
- Currently the lock defaults to a known combo that just happens to be easily remembered by the nemonic “bite”. You can change that easily.
- If you reprogram the code from the iOS/Android Tinker app via the setCode function, this can be defeated by just pressing reset on the Photon to get back to the default. That could be fixed by using a “retained” variable type which uses backup SRAM memory, but better yet the built-in EEPROM emulation can store the code in non-volatile flash memory very easily with EEPROM.put(0, code); and retrieved with EEPROM.get(0, code);
- If you get out of sync with how many digits are in the master code vs. the code you are entering, it will fail over and over. Some way of indicating failure without a Serial terminal is necessary. Possibly flashing the D7 led in that case would be a good option.
- The idea for the D7 output lighting up for 10 seconds when the correct code is entered was so that we could have time to open a solenoid lock but you can use this GPIO output for whatever you’d like.
- You could possibly add a combination with an incredible amount of numbers.
- 8765309 for a code is not recommended for security purposes :)”