
“The Stomp Shield for Arduino from Open Music Labs use an Arduino Uno and four opamps as a guitar effects box. Similar to the previous instructable that shows how to port the Electrosmash Uno Pedalshield, I have also ported the Open Music Labs Guitar Effects box to the ATMega1284P which has eight times more RAM than the Uno (16kB versus 2kB).
Compared to the previous instructable using the ATMega1284 effects unit, this box has the following advantages:
(1) It has a mixer which mixes the unprocessed signal with the MCU processed signal - that means that the quality of the signal at the output is much improved.
(2) It does 16 bit output processing for the two PWM outputs wheras the previous effects box use 8 bits for some of the examples such as the delay effect.
(3) It has a feedback potentiometer which can be used to enhance the effects - especially with the flanger/phaser effect about 30 percent feedback adds considerably to the quality of the effect.
(4) The low-pass filter frequency is 10 kHz compared to the 5 kHz of the previous effects box - this means the signal at the output sounds considerably “crispier”.
(5) It uses a different interrupt trigger which may explain the considerably lower noise level shown by this effects box.
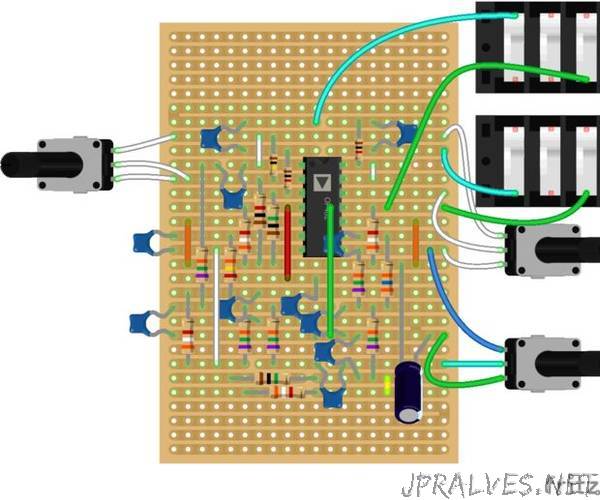
I started by bread-boarding the Uno-based Open Music Labs Stompbox Shield and I was so impressed with the performance of this four OpAmp signal processing circuit (even when using an Arduino Uno), that I transferred it to stripboard for more permanent use.
The same four opamp circuit and DSP code was then ported to the ATMega1284 - again, surprisingly apart from the non-essential changes such as assigning the switches and LED to a different port, and allocating 7,000 kilo-words instead of 1,000 kilo-word of RAM for the delay buffer, only two essential changes had to be made in the source code, namely changing to ADC0 from ADC2, and changing the Timer1/PWM OC1A and OC1B outputs from Port B on the Uno to Port D (PD5 and PD4) on the ATMega1284.
As previously noted, although development boards for the ATMega1284 are available (Github: MCUdude MightyCore), it is an easy exercise to buy the bare (bootloader-free) chip (buy the PDIP version which is bread-board and strip-board friendly), then load the Mark Pendrith fork of the Maniacbug Mighty-1284p Core Optiboot bootloader or the MCUdude Mightycore, by using an Uno as the ISP programmer, and then loading sketches again via the Uno to the AtMega1284. Details and links for this process are given in appendix 1 of the previous instructable.”