
“Learn how to set up an ESp32 webserver and control LEDs using a web interface.
Let’s learn how to build a webserver using an ESP32 and use that to control various peripherals. Instead of using a computer, we will use an ESP32 to respond to web requests, thanks to the ESP32’s built-in WiFi. The ESP32 can not only respond to requests but also serve small web pages, that were either hard coded to the code or stored in flash storage of an SD card. We’ll go through the steps of setting up the ESP32, connecting the LEDs, and creating a web interface to control them.
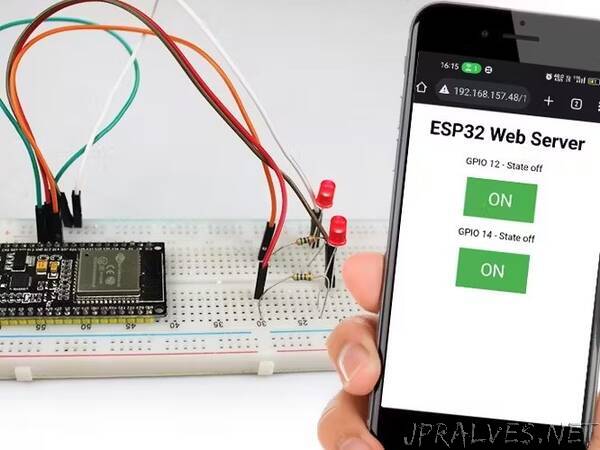
Now, Let’s get a brief idea let’s learn how to make an LED On/Off using ESP32 Webserver
- Connecting LEDs on GPIO12 and GPIO14 on ESP32 so that you can control them
- After the coding is done. Try to access the control webpage by inputting the IP address of esp32 in the browser
- Clicking the buttons on the webpage to turn the LED “ON” or “OFF”
Materials Required to Build a LED Control Webserver using ESP32
The components we require to make this project are: -
- ESP32 Development Board - this is the main component that will be used to control the LED lights through the webserver.
- LED Lights - you can use any type of LED depending on your project requirements. We have used 2x 5mm LEDs for this project.
- Breadboard - this will be used to connect the LED lights to the ESP32 microcontroller.
- Jumper wires - these will be used to connect the breadboard to the ESP32 microcontroller and the LED lights.
- USB Cable - to connect the ESP32 Development Board to your computer for programming.
- Computer - to program and upload the code to the ESP32 Development Board.
- Resistor - to limit the current going through the LED lights and prevent them from burning out.
Working of ESP32 LED WebServer
The project works by creating a web server on the ESP32 microcontrollerthat serves a web page to a client device, such as a computer or mobile phone, over Wi-Fi. The web page contains controls that allow you to turn the LED lights on or off.
Here’s a step-by-step breakdown of how the ESP32 LED webserver project works:
- The ESP32 microcontroller is connected to the LED lights and programmed to serve as a web server.
- The web server code is uploaded to the ESP32 using the Arduino IDE or other programming tools.
- The ESP32 is connected to a Wi-Fi network, allowing it to communicate with client devices over the network.
- When a client device connects to the ESP32’s IP address, the web server code serves a web page to the client device’s web browser.
- The web page contains controls for the LED lights, allowing the user to turn them on or off.
- When the user interacts with the controls on the web page, the ESP32 microcontroller receives the command and adjusts the LED lights accordingly.
- The ESP32 sends a response back to the client device, updating the web page with the current state of the LED lights.”