
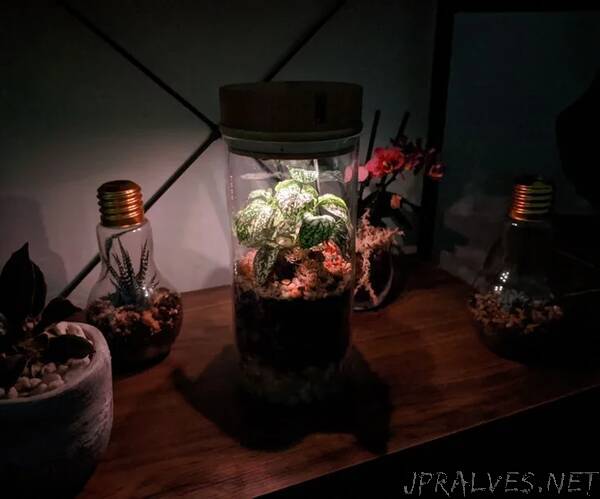
“My girlfriend is obsessed with house plants, and a little while ago mentioned she wanted to build a terrarium. Keen on doing the best job she googled how to’s and best practices of how to create and look after one of these. Turns out there is a million blog posts and no one straight answer, and it all seems to come down to the look and feel of how individual terrariums are growing. Since I am a man of science and I like data to know if something is actually working, I wanted to put my knowledge of IoT and electronics to good use and create an IoT Terrarium monitor.
The plan was to build a sensor based system that could monitor temperature, humidity, and soil moisture from a simple yet elegant web page. This would allow us to monitor the terrarium’s health so we always knew that it was in the best condition. Since I also love LED’s (I mean who doesn’t), I also wanted to add a neopixel that would turn the terrarium into the perfect mood or night light as well!
After planning the build I knew I wanted to share this so that others could make their own. So to allow everyone to be able to reproduce this project, I have only used easy to source materials which can be purchased in most brick and mortar stores or easily through sites such as Adafruit and Amazon. So if you are interested in building your own Iot-Terrarium on a Sunday afternoon read on!
Supplies:
For the most part you should be able to purchase similar items as myself. But I encourage you to diversify and go bigger and better, so some of the items listed below you may want to adapt to your specific build. I will also list some alternative materials and methods throughout this inscrutable for those who don’t have access to everything. So, to start there are a few tools you will need in order to follow along, these are;
Drill & Bits - Used for drilling through the lid of the terrarium container to mount your sensors, lights and controllers.
Hot Glue Gun - Used for gluing the sensors to the lid of the terrarium. You may choose to use a different mounting method like superglue or nuts and bolts.
Soldering Iron (Optional) - I decided to make a dedicated PCB for this project so that the connections were the best possible. You can also use a bread board and jumper wires and achieve the same result.
About 4 hours - This project from start to finish in building took me about 4 hours or so to complete. This will depend on how you decide to build you version
Below is a list of materials for the electronics for sensing and controlling the terrarium. You do not have to use all of the sensors, nor do you have to use the same sensors for your terrarium, but for the supplied code these materials will work out of the box. A little heads up, I do use amazon associate links for this, so thank you for the support if you decide to purchase anything from those links.
An ESP8266 - Used for controlling the neopixel, reading the data from the sensors, and showing you the web page. You may also choose to use the Adafruit HUZZAH
Adafruit Flora RGB NeoPixel (or from Adafruit) - These are awesome little neopixels in a great form factor. They have all of the other necessary passive components on them as well for easy control.
DHT11 Temperature Humidity Sensor (or from Adafruit) - A basic temperature and humidity sensor. You may also use the DHT22 or DHT21 for this as well.
Soil Moisture Sensor(or from Adafruit) - These come in two flavours. I used a resistive type, but i recommend the capacitive type like the one from Adafruit. More on these later.
A 5V (1A) Power Supply- You will need a 5V power supply for this project. This needs to be at least 1A in power, so you could also use a standard USB wall socket as well.
A prototype PCB- Used to connect everything together in a robust manor. Can also use a breadboard and some jumper wires too.
Some mounting bolts - Used to mount your PCB to the lid of your jar. You could also use hot glue as well.
PCB Headers- To mount the NodeMCU to the PCB.
Wire - Any variety of wire to connect the PCB and sensors together.
For your actual terrarium, there are limitless options that you have. I highly recommend heading to your nearest garden center for all of your supplies as well as advice. There you can also ask for help on the best combination of materials to build a Terrarium for the plants you use. For myself, my local garden center had all the necessary materials in convenient little bags. These were;
A Glass Jar - Usually found in your home store. This can be of any shape or size you desire, but should have a lid that will allow you to drill through and attach electronics.
Plants - The most important part. Choose wisely and make sure to match all the materials in the build to suit your plant. I used a little help from here.
Soils, Sands, Pebbles, Charcoal, and Moss - These are the basic building blocks of a terrarium and are usually easy to find in a hardware store with a gardening section or your local nursery
Also check out a great number of terrarium builds right here on Instructables too!”