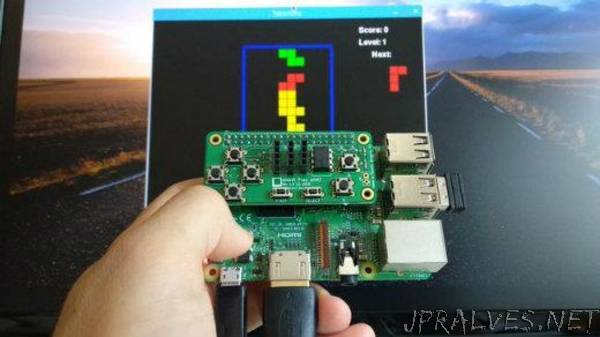
“This DIY retro video game controller for the Raspberry Pi is fun and not difficult to build but requires some time.
From time to time, I get nostalgic about the video games I played during my childhood in the late ‘80s and the ‘90s. Although most of my old computers and game consoles are long gone, my Raspberry Pi can fulfill my retro-gaming fix. I enjoy the simple games included in Raspbian, and the open source RetroPie project helped me turn my Raspberry Pi into an advanced retro-gaming machine.
But, for a more authentic experience, like back in the “old days,” I needed a gamepad. There are a lot of options on the market for USB gamepads and joysticks, but as an open source enthusiast, maker, and engineer, I prefer doing it the hard way. So, I made my own simple open source hardware gamepad, which I named the ANAVI Play pHAT. I designed it as an add-on board for Raspberry Pi using an EEPROM and a devicetree binary overlay I created for mapping the keys.
Get the gamepad buttons and EEPROM
There are a huge variety of gamepads available for purchase, and some of them are really complex. However, it’s not hard to make a gamepad similar to the iconic NES controller using the design I created.
The gamepad uses eight “momentary” buttons (i.e., switches that are active only while they’re pushed): four tactile (tact) switches for movement (Up, Down, Left, Right), two tact buttons for A and B, and two smaller tact buttons for Select and Start. I used through-hole tact switches: six 6x6x4.3mm switches for movement and the A and B buttons, and two 3x6x4.3mm switches for the Start and Select buttons.
While the gamepad’s primary purpose is to play retro games, the add-on board is large enough to include home-automation features, such as monitoring temperature, humidity, light, or barometric pressure, that you can use when you’re not playing games. I added three slots for attaching I2C sensors to the primary I2C bus on physical pins 3 and 5.
The most interesting and important part of the hardware design is the EEPROM (electrically erasable programmable read-only memory). A through-hole mounted EEPROM is easier to flash on a breadboard and solder to the gamepad. An article in the MagPi magazine recommends CAT24C32 EEPROM; if that model isn’t available, try to find a model with similar technical specifications. All Raspberry Pi models and versions released after 2014 (Raspberry Pi B+ and newer) have a secondary I2C bus on physical pins 27 and 28.
Once you have this hardware, use a breadboard to check that it works.”
