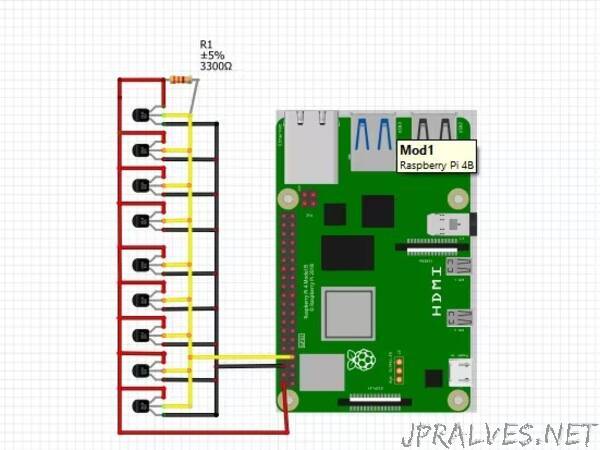
“Interfacing Nine DS18B20 Temperature sensors with Raspberry Pi and Displaying sensor data Using Python
I have gone through some tutorials for interfacing the DS18B20, In those, They have given the explanation of how to interface the DS18B20 using Arduino Platforms Only. The least countable people explained how to interface with DS18B20 With the Raspberry using Python, in that they have interfaced only One single DS18B20. Here in this project, I am Explaining How To Interface Nine(9) DS18B20 Temperature sensors with Raspberry pi 4 B.
For one of the projects, I needed to interface with 9 Waterproof Temperature sensors and Relay and Proximity sensors. Using python Programming to read the temperature From the DS18B20 was not easy initially. After a lot of Workout In the final, I read multiple DS18B20 temperatures Data. in this project I have used Raspberry Pi 4 B and Raspbian os Bullseye.
DS18B20 Sensor Specifications
- Programmable Digital Temperature Sensor
- Communicates using the 1-Wire method
- Operating voltage: 3V to 5V
- Temperature Range: -55°C to +125°C
- Accuracy: ±0.5°C
- Output Resolution: 9-bit to 12-bit (programmable)
A unique 64-bit address enables multiplexing
- Conversion time: 750ms at 12-bit
- Programmable alarm options
- Available as To-92, SOP, and even as a waterproof sensor
Where to use DS18B20 Sensor
The DS18B20 is a 1-wire programmable Temperature sensor from maxim integrated. It is widely used to measure temperature in hard environments like in chemical solutions, mines or soil, etc. The constriction of the sensor is rugged and also can be purchased with a waterproof option making the mounting process easy. It can measure a wide range of temperatures from -55°C to +125° with a decent accuracy of ±5°C. Each sensor has a unique address and requires only one pin of the MCU to transfer data so it is a very good choice for measuring the temperature at multiple points without compromising many of your digital pins on the microcontroller.
How to use the DS18B20 Sensor
The sensor works with the method of 1-Wire communication. It requires only the data pin connected to the microcontroller with a pull-up resistor and the other two pins are used for power as shown below.”
