
“Learn how to setup and use the new Raspberry Pi High Quality Camera in a headless setup.
Story
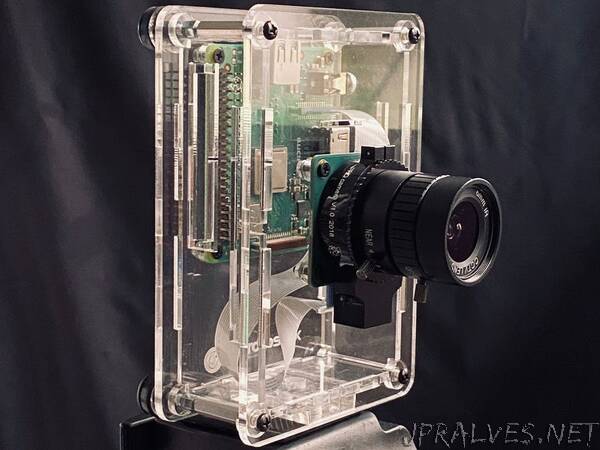
In this project, I’m going to show you how you can have a headless setup of your Pi with a Camera, in particular the new High Quality Camera with its interchangeable lens with adjustable Focus and Aperture and improved picture quality!
Introduction
After getting my hands on the new Raspberry Pi High Quality Camera (along with a “wide angle” 6mm CS mount lens), I thought I could jump right in with the photography and playing around with it. I must admit I hadn’t really tried out the Pi Camera before, even though I had an older generation one sitting around.
That’s when I realized two things:
1. It is not that straightforward to operate the Pi camera remotely, especially when trying to compose a shot. This is especially exacerbated in the new High Quality Camera because you now have control over focus and aperture and therefore would like to see and compose the shot first! The Camera Preview only works when it is directly connected to a display via HDMI/Composite/DSI so you would either need a portable display or need to be tethered and within range of your display. (……don’t worry, there IS a workaround, otherwise this article won’t exist! 😊)
2. There aren’t a whole lot of resources on getting started with the High Quality Camera, yet. This makes it difficult for someone just starting out. Combine that with problem #1, and it prompted me to write this project, to help YOU get started!
Getting Started
I’m going to assume that you have a headless setup of the Raspberry Pi (A+/B+/4B/Zero) with SSH enabled, and that you have ssh on your laptop to login to your Raspberry Pi and also know its IP address (or know how to find out!).
Why a headless setup? The High Quality Camera promises great things, with a 12MP camera sensor and the ability to use any C/CS Mount lens with it (and even more lenses using other adapters such as C to EF mount). It comes with the option to buy two Raspberry Pi recommended lenses - a 6mm CS Mount lens and a 16mm C Mount “telephoto” lens.
This really means that you don’t want to be tethered to a display. Yes, you can spend some buckaroos and get a portable HDMI/DSI display to use with your Raspberry Pi. But how nice would it be to not have your Pi Camera tethered to a display and use it headless, and leverage your laptop or mobile phone display? Yes, it’s possible!”