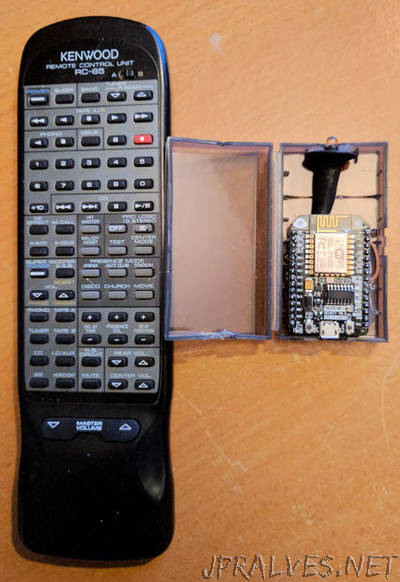
“I have always been interested in gadgets & music and if I was asked where the split is, I’d say 50-50. I’ve tinkered and hacked things together since I could hold a screwdriver; some successfully and others not so but I have never been put off by the challenge of creating something ‘better suited’ to my needs. I’m also lucky enough to have a wife that ‘understands’ me and allows me to tinker & hack, provided I do my fair share of the housework, etc. Back in the very early 90’s, we ‘invested’, in a very expensive (for us), Kenwood M-85, Midi Hi-Fi system. It had Dolby surround, a CD, Graphic Equaliser and more inputs than I really needed at the time I could have bought a much cheaper system but I knew that if I spent the money on a good system to start with, it would last a few years. And after over 25 years on, it still works perfectly apart from the ‘record deck’, (which was just too tempting for my 2 young sons but has now been replaced by a Rega RP1) and the Graphic Equaliser, which just takes a while to warm up the display. I have done my best to keep it looking good too. For a few years I had it packed in the loft and substituted by a Panasonic Home Theatre System but as good as that was, it didn’t have enough inputs for my musical/audio gadgetry. So last year I dug it back out of boxes and after building a custom shelving system for it, set it all up along with the RP1. But the remote had suffered a bit over the years and didn’t want to play. I ‘popped’ it’s shell and after a bit of cleaning with a fibre brush I noticed that one of the battery contacts had broken off the PCB and some of the internal plastic support had suffered too. I carefully replaced the battery contact with one from an old remote I had kicking around and plastic-welded a few new supports in place. Huzzah, it worked but it made me realise that this may be the weakest part of the system and getting a replacement was almost impossible unless I wanted to spend over £100 on a 2nd hand one from ebay or somewhere. So I needed to keep this one as safe as possible whilst I found a way to replicate the main controls. Which brings me to this Instructable. But before we start; I know there are many Instructables already for similar projects. However, I wasn’t able to find one that gave full instructions on the coding or how exactly you are supposed to send them from the web page to the ESP and translate that code to an IR signal that will do what I wanted it to. Most references I have been able to find were either written or explained in terms that required a higher level of expertise than I have or just didn’t go into enough detail for my comprehension. So after many hours of ‘Googling’, I finally managed to pull all of the info I could find and using a little bit of educated guessing, found a way to do what I wanted. I should also make it clear that I am quite lazy when it comes to engaging the grey matter and tend to only learn the bits that are important to what I am doing at the time. If some of the steps seem a bit disjointed, I apologise. It wasn’t until a friend told me I should post this that I started making notes. I’m no expert at any of the following but have learned what I have from many better informed sources. If you need to ask questions, I will try to answer them as best I can or point you to a better source of information. I will try to include links where they’re necessary and some images too. I will also try to include all of those who are due a credit, if I can still find the correct source. If I do miss a credit, please forgive me as I never started out to create an Instructable and in my laziness, didn’t make notes of some of the sources. Enough of the preamble and on with the project.”
