
Today I’m going to talk about a development board made by STMicroelectronics that works with the mbed development platform.
In terms of features this board is part of a family of boards that STMicroelectronics has developed and that only differ in the micro-controller they have. This one in particular has an STM32 micro-controller - the STM32F411RET6. This microcontroller is a 32-bit ARM Cortex M4 with FPU and ART (Adaptive real-time accelerator) that allows execution with 0-wait from Flash memory.
The micro-controller has the following features:
- Clock frequency up to 100 MHz
- VDD from 1.7 to 3.6 V
- 512 KBytes Flash
- 128 KBytes SRAM
- GPIO (50) with external interruption capability
- 12-bit ADC with 16 channels
- RTC
- Timers (8) - 6 16-bit and 2 32-bit timers
- I2C (3)
- USART (3) - 2 to 12.5 MBit / s, 1 to 6.25 MBit / s
- SPI (5)
- USB with OTG full Speed
- SDIO (SD / MMC / eMMC)
Micro-controller diagram:

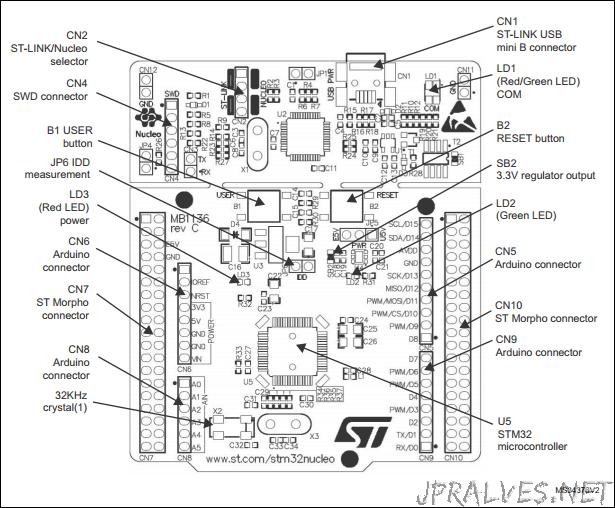
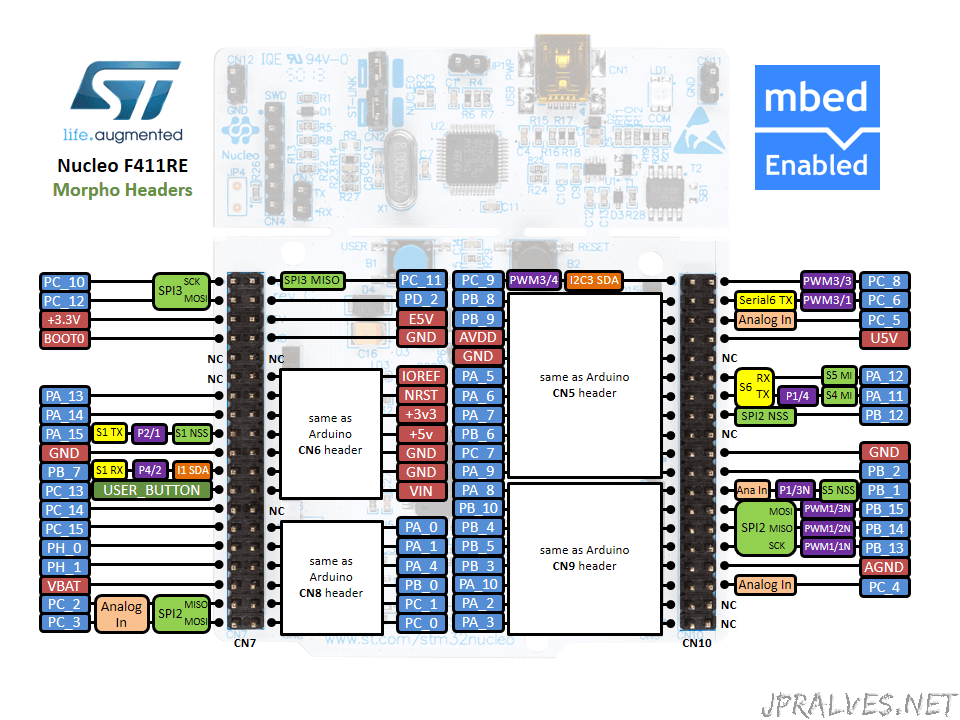
The board has Arduino-compatible pins and the Morpho interface that allow access to all STM32 pins.
There is a ST-LINK/V2-1 programmer/debugger on the board with selector that allows the programmer to be used as a standalone tool.
It has 3 LEDs: USB, user and power communications.
It has 2 push buttons: user and RESET.
USB can function as a virtual COM port, as a storage device, or as a port for debug.
The board, which can be separated, has the components arranged at the top as follows:
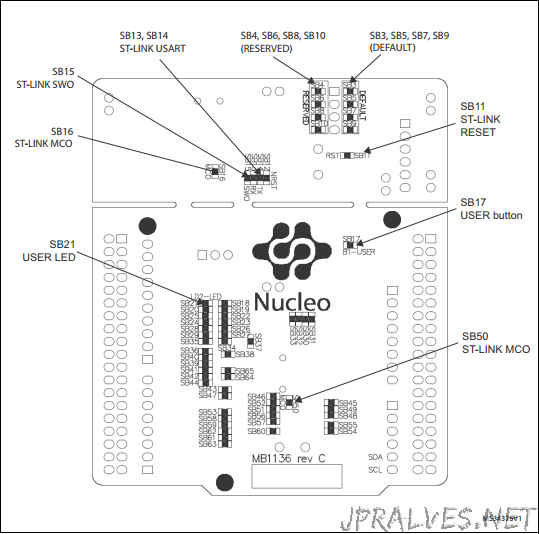
On the back have the following configuration:
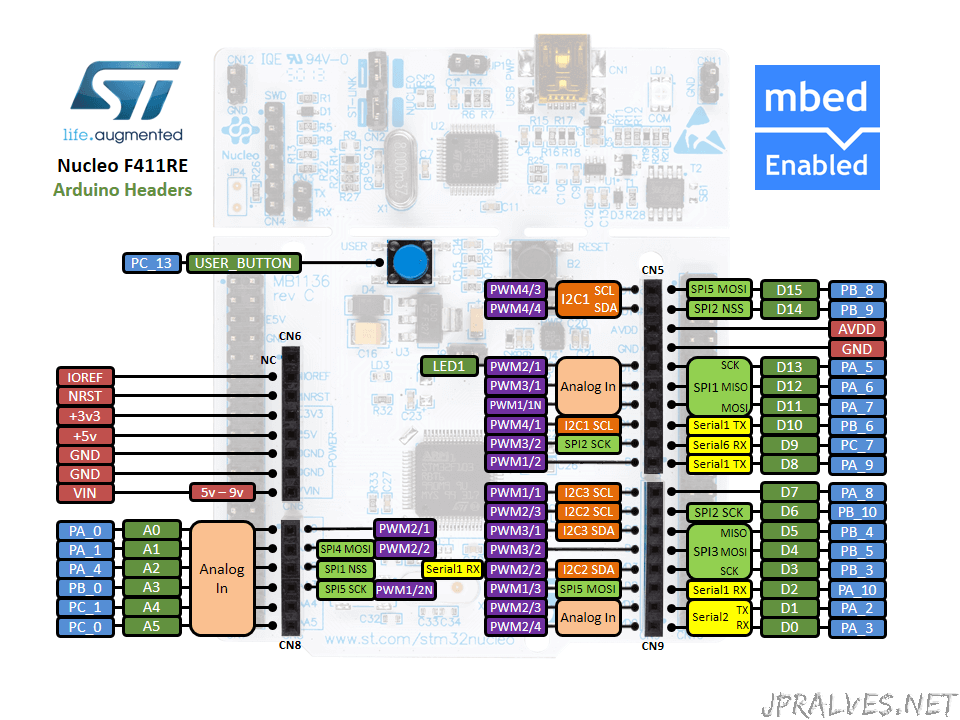
Pinout of Arduino compatible headers board:
Pinout of the board with headers Morpho giving access to all STM32 pins:
Although this board allows programs to be developed using IDE tools such as IAR, KEIL, and other IDEs that use GCC, we will use the mbed platform to make programs for the board.
In order to use the mbed platform you must access the developer.mbed.org.
Create an account and log in.
At this point you should select in which platforms you want to make code on the mbed. Access the “Platforms” option and then choose the “Platform vendor” = “STMicroelectronics”. Then choose the “NUCLEO-F411RE” board and then select “Add to your mbed Compiler” so that this type of board becomes available.
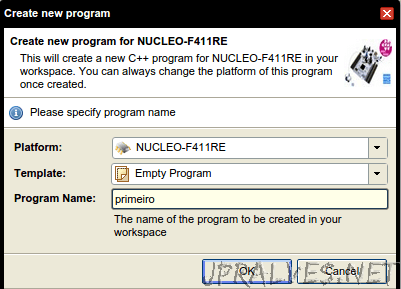
Now let’s do the first program. Load the “Compiler” option. Then “New” and “New program”.
At this point we should import the mbed library. To do this click the “import” button and then in the “Libraries” choose “mbed” and press the “Import!” Button.
Next we will create a file called “main.cpp”. This will contain the initial code of our program.
Put this code in the file:
#include "mbed.h"

DigitalOut myled(LED1);

int main() {
    while(1) {
        myled = 1; // LED is ON
        wait(1.0); // 1 sec
        myled = 0; // LED is OFF
        wait(1.0); // 1 sec
    }
}
The code will blink using LED1 (Internal).
Press the “Compile” button. Browser will download a file when the compilation is successful. At this point we can connect the card to the PC through the USB cable and the file can be placed in the Drive that appears. The code is executed immediately.
Now let’s change the program to start using other pins:
#include "mbed.h"

DigitalOut led1(D2);
DigitalOut led2(D3);
DigitalOut led3(D4);

int main() {
    while(1) {
        led1 = 1; // LED is ON
        wait(0.2); // 1 sec
        led2 = 1; // LED is ON
        wait(0.2); // 1 sec
        led3 = 1; // LED is ON
        wait(0.2); // 1 sec
        led1 = 0; // LED is OFF
        wait(0.2); // 1 sec
        led2 = 0; // LED is ON
        wait(0.2); // 1 sec
        led3 = 0; // LED is ON
        wait(0.2); // 1 sec
    }
}
The Circuit should be as follows:

When the code is compiled the interface presents us with a lot of useful information.
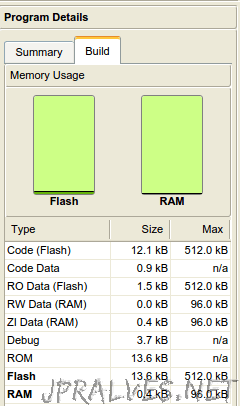
In this summary we can see how much space in Flash occupies our code and what RAM it needs.
If you want a slightly more complex program, this is the code for the program that was initially loaded in the micro-controller:
#include "mbed.h"

DigitalOut led(LED1);
InterruptIn btn(USER_BUTTON);
Serial serial(SERIAL_TX, SERIAL_RX);

enum {DELAY_SLOW = 500000, DELAY_FAST = 100000, DELAY_FLASH=50000 };
long delay = DELAY_FAST;
bool pressed = false;
long counter = 0;

static void flash()
{
    for (int n = 0; n < 12; ++n) {
        led = !led;
        wait_us(DELAY_FLASH);
    }
}
static void onButtonPress()
{
    delay = (delay == DELAY_SLOW) ? DELAY_FAST : DELAY_SLOW;
    pressed = true;
}
int
main()
{
    serial.baud(115200);
    btn.fall(&onButtonPress);
    flash();
    set_time(1393936792); // set the onboard RTC
    printf("MBED Nucleo Blink Test (v1.0)\n");
    while (true)
    {
        led = !led;
        ++counter;
        if ((counter % 10) == 0) {
             time_t seconds = time(NULL);
             printf("%d %d %s", counter, seconds, ctime(&seconds));
        }
        if (pressed) { pressed = false; printf("# button pressed\n"); }
        wait_us(delay);
    }
}
This code is in this link and can be imported.
Note: If there is an error. Do “update” on top of the mbed folder of the nucleoBlink program.
This is just an example of the possibilities this board and mbed ARM can do.
Explore the examples and code that have already been made by other users. In the Cookbook section there are lots of examples of how to do different things with this board.
Conclusion
The programming made in mbed is “similar” to what is done in a traditional IDE, the code has versioning associated with it which can become an added value.
The board was purchased for 10 € which makes it an interesting option.
If you want to venture into the ARM world without spending too much this is an option.