
“A sundial can track the Sun’s movement throughout the day and year, turning it into a clock, compass, and calendar. There are many types of sundials from relatively simple ones to ones that are quite complex.
My intent is not to teach you about these sundials and how they work but I want everyone to be able to enjoy making a sundial that will actually work. If you would like to learn more about a wide variety of sundials then I invite you to visit my web site. There you will find information on how to design and build many different sundials. The link to my site is provided in the last section of this instructable.
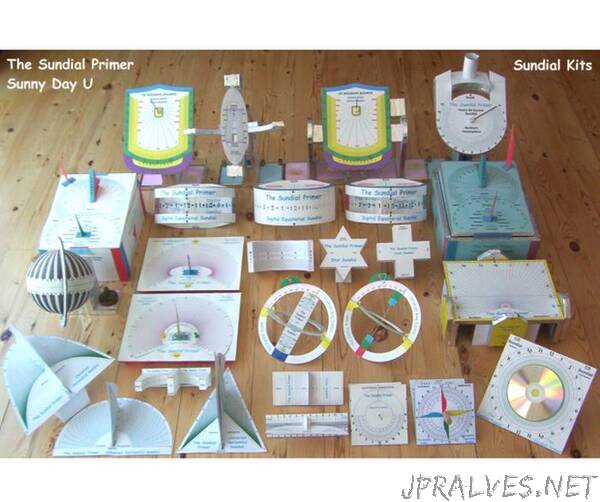
I have put together a number of universal paper sundial kits. No fancy mathematics is required to build these sundials. All you have to do is print the pdf file snd start building. Some of the sundials are quite easy to assemble but there are a couple that are a challenge. All are possible as can be seen from the models above.
The kits are available in models for both the Northern and Southern Hemispheres. All you need are scissors, glue and a “little” patience. Try them all!
Many of these sundials are illustrated with a 3-dimensional drawing that was created using an older version of AutoCAD. Once the sundial was drawn a light source was defined. This light source simulated the sun. To do this a latitude and longitude were entered to position the sundial anywhere in the world. A month, day and time were selected. The sundial must be positioned correctly in order for the sun to illuminate it as if it were in its actual location. The 3-dimensional drawing is then rendered. This process gives the drawing a photo-like finish. It also projects a shadow on the sundial that appears as it would if you were looking at a real sundial. In every case the time shown on the sundial images matched the time that was entered.
All of these sundials indicate local apparent or solar time when positioned correctly. To convert this to clock time a couple of corrections need to be applied. These corrections are discussed in a later section as well as the graphs I created that make this easy to do. Information is also provided on how to position the sundial correctly.
There are paper sundial kits available below for 21 different types of sundials: Equatorial Sundial, Polar Sundial, Cycloid Polar Sundial, Cross Sundial, Equatorial Ring Sundial, Star Sundial, Horizontal/Analemmatic Sundial, CD Sundial, Gnomon-less Equatorial Sundial, Universal Analemmatic Sundial, Digital Equatorial Sundial, Standard Time Equatorial Sundial, Globe Sundial, Universal Ring Sundial, Pinwheel Equatorial Sundial, Universal Horizontal Sundial, Universal Foster-Lambert Sundial, Universal Bifilar Sundial, Standard Time Equatorial Ring Sundial, Universal Hours Before Sunset Sundial
The number of models is more extensive.
I hope that you will enjoy making some of these models and learn just a little more about sundials along the way.
Tools
The following tools are needed to complete the most complex paper sundial kit, with the simpler ones requiring fewer:
- Printer: to print the sundial kit pdf file at full scale.
- Scissors: very sharp and not too large to manage some of the small cuts.
- Exacto knife: for the cuts too difficult for the scissors.
- Utility knife: for cutting styrofoam.
- Wire cutters: for cutting wire coat hangers.
- Hack saw: for cutting threaded rod and wire coat hangers.
- Metal file: to remove sharp points from coat hanger and threaded rod after cutting.
- Cutting board: to protect the surface where cutting will take place.
Materials
- Paper: 8.5” by 11” regular and card stock. Card stock is required for some models as the 20 lb. printer/copier paper is too light in some cases.
- Clear printer transparency: for the Digital Equatorial Sundials and Standard Time Equatorial Ring Sundial.
- Clear vinyl sticker paper (optional): to laminate the cutouts for some of the more complex sundials.
- Craft glue: for gluing the paper together and to the syrofoam if no lamination is used.
- Cotton swabs: for applying glue.
- Silicone adhesive: for adhering laminated paper to styrofoam.
- Wire coat hanger: for making gnomons. One should be enough but make sure it is straight and not all bendy.
- 1/4” threaded rod (or smaller), nuts, washers: to make the adjustable bases for the sundials made with styrofoam.
- Drinking straw: and option for gnomons.
- Wood dowel: 1/2 inch dowel is needed for the PInwheel Equatorial Sundial.
- Styrofoam: 1/2 inch blue or pink and not the white flaky stuff.
- Cellophane (Scotch) tape: for taping stuff down.
- Metal foil duct tape (optional): comes in 2” wide rolls that will be cut down to a 1” width. This is used to finish the edges of the cut styrofoam and some flat areas just to make it look better.
- Thumb tacks: to hold things in place.
- Paper clips: also to hold things in place.
- 6” diameter styrofoam ball: for the Globe Sundial. This may be tricky to find but a craft store should have these available.
- Black (or other colour) paint or stain: to colour the styrofoam ball for contrast if it happens to be white. Be careful as some spray paints will eat the styrofoam.”