
““How is the weather?” In modern times, for a reliable answer to that question, you’re much better off asking a machine than a human. Wouldn’t it be fun to build such a device yourself? With that in mind, in this project article, Mark explains how to build your own hobby weather station that is solar powered, runs over Wi-Fi and logs all its data to Adafruit IO.
If there is one topic that consistently comes up in small talk, it is the weather. In many of those conversations a huge topic is the unreliability of weather forecasts. In reality, there can be a marked difference in weather even the short distance between me and the nearest government weather station. The standard reporting time tends to be hourly, but weather conditions often can change far more rapidly.
The previous day’s weather also consistently raises questions. How hot or cold did it get? Did it rain at your house? That wind was crazy last night, wasn’t it? At times, weather systems can be localized, and while my house may have had no rain, a friend’s house a few kilometers away might have gotten a small flood.
I have always had an interest in the weather, maybe because I live in an area where the temperature can range from -40°C to +40°C, where we get among the most hours of sunlight in Canada, but we can get crazy summer thunderstorms rolling across the prairies and raging blizzards in the winter. After paying attention to the weather, it is apparent that many official sources are slow to update and not always accurate to my exact location.
At a technology conference five years ago, when the idea of Internet-connected devices aiding everyday life was becoming more popular, I attended a workshop on the Internet of Things (IoT). At the end of the workshop, there was a giveaway for the Intel Edison developer boards that had been used in the workshop, and I was lucky enough to get one. I was amazed that, with this small system, I could do so much.
When I arrived home, I started to look into what I could do with this new technology, and found a SparkFun BME280 breakout board that could measure temperature, pressure and humidity. After hooking up the sensor, it did what it advertised, telling me the local temperature. This spurred me to order more parts to build a complete weather station. The parts arrived and promptly got sidelined in a box, due to competing time priorities and frustrations with my lack of knowledge about microcontrollers (MCUs) and electronics, and how to get this project outdoors and, ironically, to survive the weather it was measuring.
Three things recently happened to renew my interest in completing this project. First, for Christmas I received some Adafruit components, allowing me to learn more about MCUs and discovering Adafruit IO. Second, I received a 3D printer for my birthday, letting me learn to build enclosures to host my electronics. And third, the pandemic hit, giving me more free time, which I used to dig out and complete my old project.
DESIGN OVERVIEW
While designing the weather station I had three main objectives. The first was to enable the project to run remotely, with no wires connecting it to power or network. Second was to have the project send the measured data to the Internet so that it could be visualized and consumed by other projects. And third was to reuse mostly components that I already owned.
To achieve these objectives, I made three key decisions about the weather station. The project would be built using an Adafruit Feather M0 Wi-Fi. The project would run off a battery, recharged by solar power utilizing a SparkFun Sunny Buddy. The project would use Wi-Fi to connect to the Internet using Adafruit IO cloud service as the receiving server.
The free Adafruit IO service offers pre-built Arduino libraries to store data to their services, dashboards and charts to display the data, and has sufficient capacity to store the amount of data required. A subscription service called Adafruit IO+ is also available, with increased data, storage and feeds.
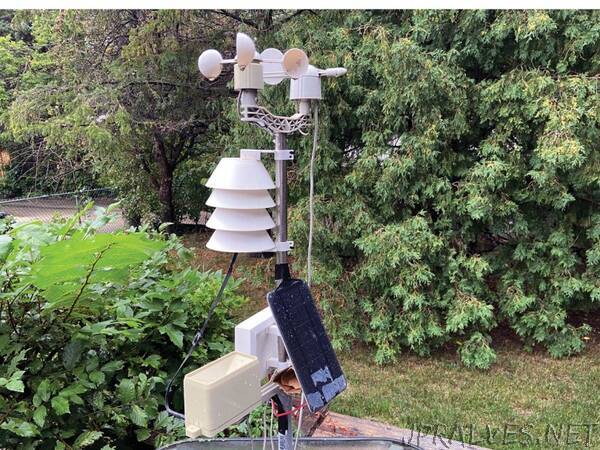
The sensors for the project include a SparkFun BME280 for temperature, pressure and humidity readings, and the SparkFun Weather Meters to measure wind speed, direction and rain amounts. The Adafruit Feather M0 has a built-in circuit to read the current battery voltage.
The weather station’s flow purposely was kept as simple as possible. The Feather M0 wakes up every minute to read the attached sensors and transmit the data to Adafruit IO. Not all measurements are sent every minute, since some need more data to be useful. After the measurements are sent, the processor goes into a deep sleep mode to wait for the next minute. To recover from any unexpected errors that may lock up the weather station, a watchdog timer is enabled that is reset every 10 seconds.
The electronics in the weather station are relatively straightforward. There are two main systems: the processing system, consisting of: 1) a Feather M0 hooked to the BME280, weather gauges and a reset button; and 2) the power system, comprising a Sunny Buddy solar charger hooked up to the solar cell, battery and power switch. The power system load output is connected to the battery port on the Feather.”