
“Replace an unreliable cheap pressure switch with an Arduino-controlled high current relay.
This whole project started when one of my air compressor at work started eating pressure switches and burning out the compressor unit, I replaced the first one with a cheap ($17) off-the-shelf switch and it lasted about a month. The next switch I installed was a higher end model ($215) and it lasted about 2 months. After the third switches, I decided to make my own switch using an Arduino controller and a high current rated relay. The factory switches ranged in price anywhere from $17 to $215, I built this unit for $187 total (not including time). This air compressor has a high cycle rate, that is why it was destroying so many switches. It will cycle anywhere from 30 to 50 times a day.
The Arduino controller had to be fail safe or it would be a hazard to run, so I built into the controller safety interlocks and monitors that if any problem were to present its self the Arduino would shut down. I also reused the original pressure switch as a redundant fail safe that just sits in the background and monitors pressure, if the pressure rises to a set amount it opens the power circuit and shuts down the air compressor.
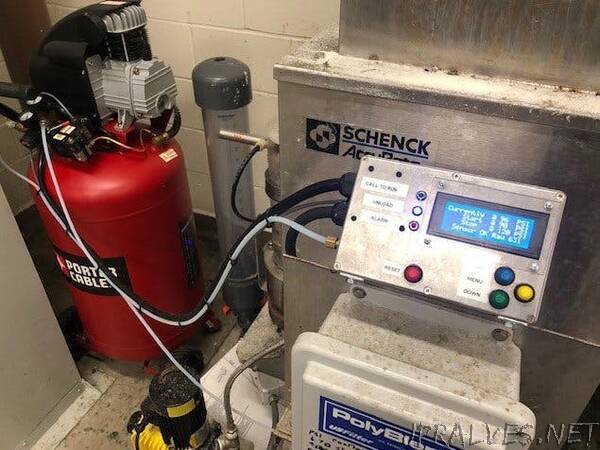
The Arduino controller also has a 4-line display I use to set the start/stop values and also the high/low analog raw input values I use to monitor the health of the pressure transmitter. I programmed the controller using a menu based program, this way I can use this program for other systems by making a few simple changes to the different menu’s.
After building and programming the unit and running it through a series of test, I had a major controller fault after I installed the solenoid, every time the solenoid would de-energize the Arduino would reboot. I fixed that by simply using plastic stand off to mount the Arduino to the aluminium project box, seems that there was some stray voltage or a voltage spike introduced by the solenoid every time it de-energized. Another problem I had during the development phase of this project were my set points. How do I keep my set points if there is a power failure? in comes EEPROM! so after much trial and error using EEPROM for the first time I managed to get the EEPROM to work and work very well. I used the “Get” and “Put” commands so that the EEPROM will last that much longer, see the get and put commands only write to EEPROM if it has changed instead of every loop pass. EEPROM only has so many cycles before they fail, 150000 cycles on average.
I also monitor the raw analog input value from the transmitter, if it drops below .5 vdc that indicates the transmitter or the wires have shorted and that will initiate an alarm on the display “Xmtr Short” and shut down the controller. If the raw analog value goes above 4.5 vdc that indicates the transmitter or the wires have opened and that will initiate and alarm on the display “Xmtr Open” and shut down the controller.
When you go through the 5 menu’s you will find that the first 4 menus let you adjust the start/stop/alarm low and alarm high set points, the last menu is a maintenance menu, I put that in their for testing and troubleshooting purposes. You can turn on and off the compressor motor via the +/- buttons. But this menu does not time out and go to menu 6 like the other 4 menus do so heed this warning! “Do not leave the controller in menu 5 with the compressor running because the controller is paused and not watching or monitoring the pressure.” Menu 5 is strictly for testing purposes and you must exit to run the compressor with the safeties enabled.
I also added a reset button to the front panel so the unit could be reset without having to open the box. I haven’t had to use it but I thought it would be convenient to have. I just paralleled the external reset button over the Arduino’s internal reset button.
The compressor unload solenoid is mounted next to the old pressure switch and I used the old switch to hold the solenoid in place with a big tye wrap. then I moved the copper tube from the old switch mechanical unload-er to the new solenoid valve. this was something I completely forgot about when I built the unit and had to rewrite the code to add the second out put for the unload valve, live and learn I guess!
I apologize for the lack of a real print, I just didn’t have time to learn to use the Fritzle schematic drawing software, I also apologize for the quality of this work, I’m brand new to Arduino and to this Project Hub, this is my first time publishing anything…lol.
As of this writing the compressor has been working flawlessly for 9 months!”