
“For a while I wanted to get back into making some projects with microcontrollers. Last time I touched any microcontroller code was a few years back when I tried to make a heating regulator for a friend with Arduino Nano. My friend was interested in programming, he would come over at night and we hacked on this little thing for some time. We bumped into some problems with the power supply as it would not behave properly when we used a random old DC adapter. Life happened and we lost interest before it could actually be tested. Maybe we were just debugging too late at night, there was some whiskey involved, so who knows..
Anyhoo, recently I wanted to try out embedded rust. After some looking around, PIC32MX series sounded like a good choice for a project I have in mind (more on that later). It has with enough number of IO pins and in built USB support and is a way overkill for blinking a LED.
Disclaimer: This post is for the noobs like me to get started with PIC32 in rust.
This is my first attempt to program a Microcontroller outside of Arduino boards. I have huge gaps in my knowledge abut how these things work. I’m always open to suggestions and discussion, please reply to the threads on reddit, twitter or email me. (If I can stay motivated to learn, I may post more stuff here later)
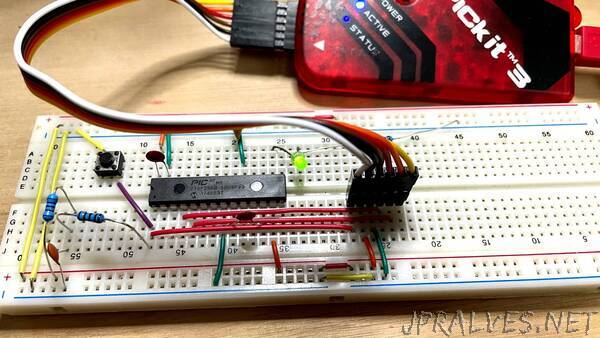
There are PIC32 development boards like this but I went the bare chip route. It was a less convenient solution but it provides more opportunities to learn tinker. To get started you need a few components and of course a PIC32 microcontroller (at least one 😉).
Following is the bare minimum that you need to write “hello world” (blink an LED).
- Breadboard
- Jumper Wires
- LED
- PIKITTM3 Programmer
- PIC32 (in my case MX270F256B)
- assorted ceramic disk capacitor kit
- assorted resister kit
- push buttons, and other stuff if you want to expand your program (optional)
I recommend getting an inexpensive hobby electronics starter kit that provides a bunch of components like resistors,capacitors and LEDs etc.
According to Wikipedia
A microcontroller (MCU for microcontroller unit) is a small computer on a single metal-oxide-semiconductor (MOS) integrated circuit (IC) chip. A microcontroller contains one or more CPUs (processor cores) along with memory and programmable input/output peripherals. Program memory in the form of ferroelectric RAM, NOR flash or OTP ROM is also often included on chip, as well as a small amount of RAM. Microcontrollers are designed for embedded applications, in contrast to the microprocessors used in personal computers or other general purpose applications consisting of various discrete chips.
So the journey to the rabbit hole started. I came across pic32-rs a carate for rust binding for the PIC. Once my chips arrived in the mail, I was excited to play with them, but I had no idea where to begin. Duckduckgo didn’t give me much result, for whatever reason most of PIC tutorials are old, it seems the interest in PIC slowed down since Arduino and other hundreds of little boards came to the scene. It turns out that, one can figure out a lot just from the PIC32MX family datasheet alone. There is also a user guide to the PIKITTM3 programmer.”