
“This project describes how to build an ATSAMD21-based computer on a prototyping board using the minimum number of components, and program it from the Arduino IDE.
I give two alternative methods of uploading a bootloader to the bare ATSAMD21 chip using the Arduino IDE. You can then program the minimal ATSAMD21 computer from the Arduino IDE via the USB port, like any other Arduino board.
Introduction
If you’re looking for something more powerful than the ATmega328 in the Arduino Uno a good choice is the ATSAMD21. This is an ARM Cortex M0+ processor with up to 256 KB flash memory, 32 KB RAM, and a 48 MHz clock, so it’s substantially better equipped than the ATmega328. In addition it has a USB interface built in, so there’s no need for a separate chip to interface to the serial port.
Arduino have designed several excellent boards based on the ATSAMD21, such as the Arduino Zero or smaller-format MKRZERO. However, these boards are an expensive way to use an ATSAMD21 as the basis for your own project, and they probably include many features you don’t need.
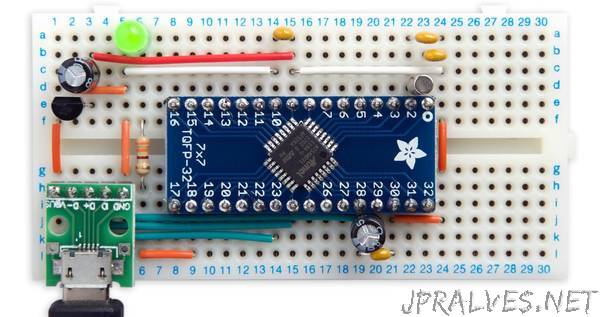
In fact all you need to build an ATSAMD21-based computer on a prototyping board is:
An ATSAMD21 processor on a breakout board.
A USB socket on a breakout board.
A 3.3V LDO regulator.
A 32.768kHz crystal for the processor clock.
Half a dozen decoupling and smoothing capacitors.
An LED and resistor to let you verify that everything’s working by running the Arduino Blink program.
I chose the smallest 32-pin variant of the ATSAMD21 with the maximum 256 KB flash memory and 32 KB RAM, the ATSAMD21E18A.
Installing a bootloader
If you want to be able to program the ATSAMD21 via the USB port, using the Arduino IDE, it’s first necessary to install a bootloader in the chip to handle the USB to serial interface. One way to burn a bootloader into a bare ATSAMD21 is to use ATMEL Studio together with a programmer such as the Atmel ICE, or a JTAG programmer such as J-Link EDU.
Fortunately there are two easier ways that only require the Arduino IDE and another Arduino ATSAMD21 board:
Using the Atmel Embedded Debugger (EDBG) on an Arduino Zero board.
Using Debug Access Port (DAP) to install a file from an SD card using an ATSAMD21 board.
I describe both of these alternatives in detail below so you can choose the one that’s easiest for you.”