
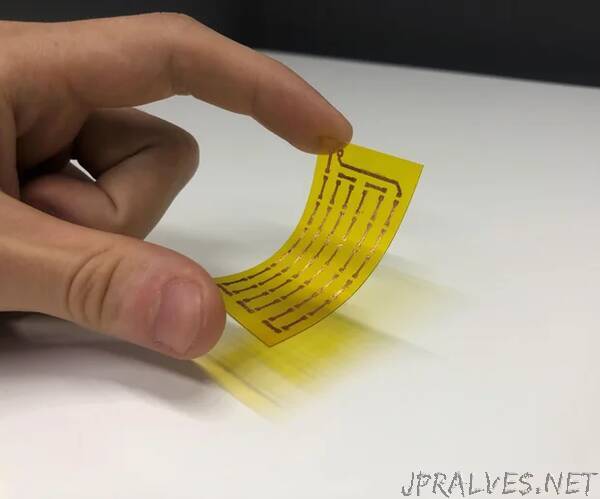
“A few months ago I started developing my own bio-impedance measurement system and I planned to use a flexible printed circuit board as a sensor. Since I haven’t used this type of board before, I started looking for a manufacturer specializing in flexible PCBs. I found that I can order one from PCBWay.com but to my surprise, the automatically calculated price was way too expensive (111.98$ for the board used in this instructable).
For a minute I thought that maybe I can make a flexible PCB by myself so I started to surf the internet on how to make a flexible PCB at home. I found that many people use a material called “Pyralux”. Unfortunately, I couldn’t find this material in my country and I didn’t want to order it from China, since the delivery will take another 6 weeks. So the only way to go was to create something new from materials that are easily accessible to everybody. Ladies and gentlemen buckle up your seatbelts and get ready to jump into this instructable on how to make your own flexible printed circuit board!
Supplies:
- Laser printer
- White A4 paper
- Glossy magazine paper
- Transparent sheet (200 microns thickness)
- 1200 grit sandpaper
- Copper tape (50mm wide)
- Kapton tape (50mm wide)
- Paper tape
- Scissors
- Pencil
- Cotton ear picks
- Protective gloves
- Plastic container
- Microfiber towel
- Acetone-free nail polish remover
- Ferric chloride etchant
- Nail polish remover with 75% acetone
- Spray bottle with water
All these supplies you should be able to find easily at your local stores. For example, I got a transparent sheet at a local office supply store for only 0,29€ also I got 1 metter of copper tape at a local electronics component store for 1,30€. The most expensive material was a good quality Kapton tape which cost around 14,59€ at a local electronics component store. I recommend using only a good quality Kapton tape because the cheap one will deform from heat when you will solder.”