
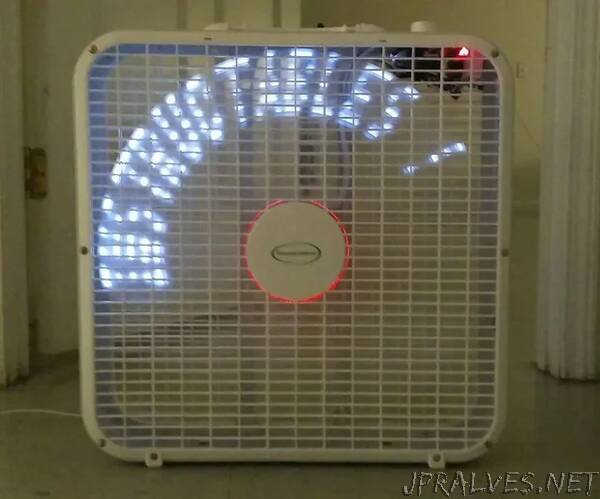
“This is a variable speed, POV (Persistence Of Vision), Fan that intermittently displays the time, and two text messages that can be updated “on the fly.”
The POV Fan is also a single page web server that allows you to change the two text messages.
To use this POV Fan, there must be a wireless network with “client sharing”. If you don’t know what client sharing is, it’s easy to find out. Look for other computers on your network. If you can see them, you have client sharing capabilities on your network. (Most hotels and public venues don’t allow client sharing—client isolation— for obvious security reasons.)
The POV uses the “WifiManager” library which makes it easy to connect to the wireless network wherever you may be. Once connected to the wireless network, the POV Fan will display the IP address you need to put in your web browser address bar. You can change the text in the POV Fan via the web page.
This instructable is a little bit above the novice level. There is some soldering, drilling, “hot glue-gunning”, and electrical testing involved. If you think that your mom will be upset that you tore her favorite fan apart, and endangered your household by exposed electricity, maybe you ought to do something different, otherwise read-on.
Supplies:
Hardware:
ESP8266—-This can be a NodeMCU VIN5v—3.3Logic, Super Node VIN3.3v, Weemos VIN5v—3.3Logic, Adafruit Huzzah VIN5v-3.3Logic Sparkfun Thing VIN5v—3.3Logic, or bare ESP8266 VIN3.3v (as long as you can program it. I don’t go into detail of setting up a programming board for a bare ESP8266, so the USB capable boards mentioned may be easiest.) Note the requirements necessary in the picture above.
AMS1117-3.3v and 10k resistor (for 3.3v boards)— This is a 3.3v power regulator. Note the above, aforementioned options of ESP devices and the voltages listed next to them. If you have a VIN 3.3volt system, the AMS1117-3.3v is necessary. The bare ESP8266 is 3.3v.
Hall Sensor and 10k resistor—- I use the 3144 variety. Although they are rated for 4.5v and up, I’ve had great results with the 3.3v rail. I use a 10k resistor to reset the trigger by “leaking” the voltage back out (pull default low).
(5) LEDs (and optional resistors)—- Use whatever you can find. The ratings for an LED demand a resistor to keep a steady current from free-flowing through the LED and being similar to a short circuit. Note the LED data pages with the rating for SUSTAINED power. For “Pulse Width Modulation, PWM” or rapid flashing, the LEDs can withstand a little variance in the voltage so the resistor is optional in a 3.3v system. I like the superbright white 3mm or 5mm, ~3.4v @ 20mA. If you use a red LED, be aware that the voltage ratings may be significantly lower, 1.8v @ 20mA, so resistors may be a good precaution.(voltage_rail - LED_voltage) / Amperes = resistance needed. ie, (3.3v-1.8vLED=1.5v) divided by .02A or 20mA = 75 Ohms resistor recomended.(Note: The best resistor tutorial I remember is from a Raspbery Pi tutorial I was watching— https://www.youtube.com/watch?v=ZNNpoLFbL9E&t=227… at roughly the 2:40 mark— It’s a great learning epiphany! I drew the circle above for reference.)
Cheap 5v wall charger—- I used an old one from a phone. We’re going to crack it open and throw solder to it. A cheap one from a Dollar Store would be adequate.
Wireless Charging Coils—- I use something like this, or this. It’s small but very effective. The ESP8266 uses somewhere around 300mA when transmitting wirelessly. Bigger isn’t necessary— just more expensive. … besides, a capcitor in line with the DC voltage will steady the load when demand is higher.
100uF 16v Electrolytic Capacitor— The voltage will need to be at least 5v. Anything over 5v will be fine. A 16v cap is overkill, but also cheap and easy to find.
Magnet— I had a couple of neodymium magnets lying around, but any magnet should work.
Fan— I used a cheap box fan from the local store for $12-$18 during the summer season. The styles and sizes are unlimited with an exception of hardware room. The bigger the fan, the easier it is to squeeze in the hardware. Too small a fan will look more, “Ghetto Frankenstein,” while hardware is being mounted on the outside. Note that this fan has the necessary windings for the fan speed control to work.
Fan Speed Control (Optional)— This is different than a wall switch- incandescent light dimmer. Fan speed controls change wavelengths of the electricity to optimize the inductance driving inside an AC motor. Find the correct fan speed controller for your fan. If not using a fan speed controller, You have to switch the power to the 5V rail on separately. —Some may prefer this as it allows you to turn off the POV, and continue using the fan.
Shrink Tubing— and/or wire insulator of choice. I’ve seen really thick paint, silicon caulking, electric tape, and hot glue used as wire insulation. On the rotating parts, it is important to keep the weight down.
Super-Glue— Super Glue is lighter than Hot Glue, and helps keep the weight down on rotating parts.
The smallest and lightest insulated wire you can find. (phone cord wire, ethernet cable wire, salvaged ATA bus HDD ribbon, …)
Tools:
Safety First— Some safety glasses are always good. Don’t get that little bit in your eye on this project.
Leather gloves — You should always wear leather gloves when drilling anything. Cloth gloves can unravel and get caught in a drill bit easily, snapping and breaking fingers and/or the drill bit.
Soldering Iron, flux, and solder
Drill and/or Dremel
Wire Cutters and Wire Strippers
Hot Glue Gun— My Daughter is the “Hot Glue Gun Ninja.” I think she can literally repair anything with it.
Screw Driver— To take the fan apart.
Electric tester
Sandpaper — If you have a nail file, that’s fine. We just need to rough up the LEDs so they are more opaque. Superglue and baking soda works just as well.”